Task 1: Installing Python and VS Code on Ubuntu Worktation (Ubuntu-WS)
Task 2: Understanding Python Interactive Shell vs Script Mode
Task 3: Your First Python Script - Hello Network World!
Task 4: Variables and Basic Data Types (integers, strings)
Task 5: Basic Arithmetic Operations for Network Calculations
Task 6: Saving and Running Python Scripts
Note: Right-click on each device and select start. Once devices are powered on then click on each device icons, the “Console” will open in the new tab.
Task 1: Installing Python and VS Code on Ubuntu Server
Once Ubuntu-WS console is open in GUI, login into it using username as user and password as Test123
First, let's check if Python is already installed on our Ubuntu server. Open the terminal on your Ubuntu-WS by pressing Ctrl+Alt+T or right-click on desktop and select "Open in Terminal". Once the terminal is open, type this command:
python3 --version
You should see something like "Python 3.8.10" or similar. If not, we'll install Python. But wait, let me explain what this command does. The python3 part tells Ubuntu we want to use Python version 3. The --version is what we call a "flag" or "option" that asks Python to tell us which version it is. The two hyphens before "version" are important - they tell the system this is a full word option, not a single letter shortcut.
Now, let's install Visual Studio Code, which is our code editor. Type this in the terminal:
sudo apt update
sudo apt install --only-upgrade snapd
sudo snap install core
sudo snap install code --classic
Let me break this down because this is important for network engineers. The sudo part means "super user do" - it gives us administrator privileges. apt is Ubuntu's package manager (think of it like Cisco's IOS repository). update tells apt to refresh its list of available software. The && means "and then" - do the first command, and if it succeeds, do the second. install code tells apt to install VS Code. The -y flag automatically says "yes" to any prompts.
After installation, you can start VS Code by typing code in the terminal, or find it in your applications menu.
Task 2: Understanding Python Interactive Shell vs Script Mode
Open your terminal again. Let's explore Python's two modes. First, the interactive shell. Type:
python3
You'll see >>> appear. This is the Python prompt. It's like being in Cisco's enable mode, but for Python. Everything you type here is executed immediately. Try typing:
print("Hello Network World!")
Press Enter. You should see "Hello Network World!" appear immediately. The print() function is Python's way of displaying output. The parentheses () are required - they tell Python this is a function. The text inside quotes is what we call a "string" - it's text data. The quotes can be single ' or double " - they work the same.
Now exit the interactive shell by typing:
exit()
Or press Ctrl+D. We're back to the terminal.
Now let's create our first script. In VS Code, click File → New File. Type this exact text:
print("Hello Network World!")
Click File → Save. Save it on your desktop as hello_network.py. The .py extension is important - it tells the system this is a Python file.Now go back to your terminal. Navigate to where you saved the file. If it's on your desktop:
cd ~/Desktop
The cd command means "change directory" - it's like moving between folders. ~ means your home directory. Now run your script:
python3 hello_network.py
You should see "Hello Network World!" appear. This is script mode - you write code, save it, then run it. Interactive mode is for testing small pieces of code; script mode is for creating programs you can run repeatedly.
Task 3: Your First Python Script - Hello Network World!
Let's make our script more network-specific. Open hello_network.py again in VS Code. Replace everything with this:
# This is my first network automation script
# Created by [Your Name]
print("========================================")
print(" Welcome to Network Automation!")
print("========================================")
print("")
print("This script will help automate network tasks")
print("Starting with basic Python commands...")
Save the file and run it again. Let me explain what I just wrote. The lines starting with # are comments. Python ignores these lines - they're for humans to read. I like to think of them like Cisco configuration comments using the ! symbol.
The print() statements create output. Each print() creates a new line, just like pressing Enter in Cisco CLI. Notice the empty print("") line - that creates a blank line for better readability.
Now, let's add some network-specific information. Add these lines to your script:
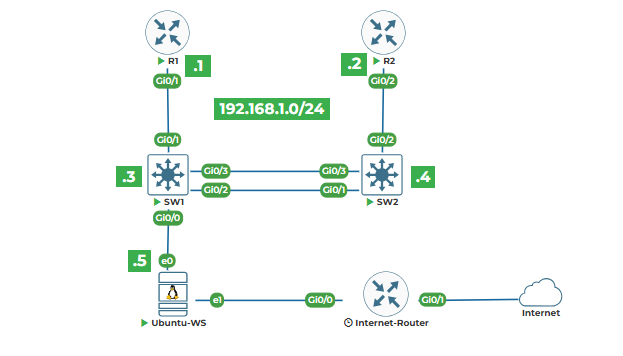
print("Network Devices in our Lab:")
print("-" * 30)
print("Router1: 192.168.1.1")
print("Router2: 192.168.1.2")
print("Switch1: 192.168.1.3")
print("Switch2: 192.168.1.4")
print("Ubuntu Server: 192.168.1.5")
The "-" * 30 is interesting. The asterisk * when used with a string and a number repeats the string. So "-" * 30 creates a line of 30 hyphens. This is cleaner than typing 30 hyphens manually.
Save and run your script. See how it displays all our network devices? This is the foundation of inventory management scripts.
Task 4: Variables and Basic Data Types
Now let's talk about variables. Think of variables like hostnames in networking - they're labels that point to data. Open a new file in VS Code and save it as variables.py.
Type this:
# Variables in Python
# Variables store data for later use
device_name = "Router1"
ip_address = "192.168.1.1"
subnet_mask = "255.255.255.0"
is_router = True
interface_count = 10
Let me explain each line. device_name = "Router1" creates a variable named device_name and assigns it the value "Router1". The equal sign = is the assignment operator - it puts the value on the right into the variable on the left.
Notice the different types of data: "Router1" is a string (text), 192.168.1.1 is also a string (because of the quotes), True is a boolean (can only be True or False), and 10 is an integer (whole number).
Now let's use these variables. Add this to your script:
print("Device Information:")
print("Device Name:", device_name)
print("IP Address:", ip_address)
print("Subnet Mask:", subnet_mask)
print("Is Router?", is_router)
print("Interface Count:", interface_count)
The print() function can take multiple items separated by commas. Python automatically adds spaces between them.
Now let's do some calculations. Add this:
# Calculate available interfaces
used_interfaces = 4
available_interfaces = interface_count - used_interfaces
print("\nInterface Status:")
print("Total Interfaces:", interface_count)
print("Used Interfaces:", used_interfaces)
print("Available Interfaces:", available_interfaces)
The \n in the first print() is special. The backslash \ is an escape character, and n means newline. So \n creates a blank line before "Interface Status:".
The calculation interface_count - used_interfaces subtracts 4 from 10, giving us 6. Python handles the math automatically.
Save and run your script. See how variables make our code more flexible? If we change interface_count to 20, all calculations update automatically.
Task 5: Basic Arithmetic Operations for Network Calculations
Network engineers do calculations all the time - subnets, bandwidth, addresses. Let's create a script for this. New file: calculations.py.
Start with basic operations:
# Basic arithmetic for network calculations
print("Basic Network Calculations")
print("=" * 40)
# Addition - adding new devices
current_devices = 5
new_devices = 2
total_devices = current_devices + new_devices
print(f"Current devices: {current_devices}")
print(f"New devices to add: {new_devices}")
print(f"Total devices after addition: {total_devices}")
print()
Notice the f before the string in the print() statements. This is an f-string (formatted string). Inside the curly braces {}, we can put variables, and Python will replace them with their values. It's much cleaner than using commas.
Now let's do subnet calculations:
# Subtraction - calculating available IPs
total_ips = 256 # For a /24 network
used_ips = 50
available_ips = total_ips - used_ips
print(f"Total IPs in subnet: {total_ips}")
print(f"Used IPs: {used_ips}")
print(f"Available IPs: {available_ips}")
print()
# Multiplication - bandwidth calculations
interface_speed = 1000 # 1 Gbps in Mbps
interface_count = 24
total_capacity = interface_speed * interface_count
print(f"Interface speed: {interface_speed} Mbps")
print(f"Number of interfaces: {interface_count}")
print(f"Total switch capacity: {total_capacity} Mbps")
print()
# Division - calculating averages
total_traffic = 8500 # MB
time_period = 24 # hours
average_traffic = total_traffic / time_period
print(f"Total traffic: {total_traffic} MB")
print(f"Time period: {time_period} hours")
print(f"Average traffic per hour: {average_traffic:.2f} MB")
The :.2f in the last print statement formats the number to 2 decimal places. This is important for clean output.
Let's do exponentiation for binary calculations:
# Exponentiation - binary calculations
bits_for_hosts = 8 # For 256 hosts (2^8)
possible_hosts = 2 ** bits_for_hosts
print(f"Bits for hosts: {bits_for_hosts}")
print(f"Possible hosts: {possible_hosts}")
print()
# Modulus - finding network addresses
ip_address = 192
network_segment = ip_address % 4
print(f"IP Address last octet: {ip_address}")
print(f"Network segment (0-3): {network_segment}")
The modulus operator % gives the remainder after division. This is useful for determining which segment an IP belongs to. Save and run this script. These calculations form the basis of more complex network automation tasks.
Task 6: Saving and Running Python Scripts
Let's create a practical script that we'll use throughout the course. New file: network_info.py.
First, let me show you how to make a script that's more professional:
#!/usr/bin/env python3
"""
Network Information Script
Author: Network Engineer
Version: 1.0
Description: Basic network information display
"""
# Import section (we'll use this later)
import datetime
# Configuration section
LAB_NAME = "Python for Network Engineers Lab"
CREATOR = "Your Name"
CREATION_DATE = "2024-01-01"
# Network device information
devices = [
{"name": "Router1", "ip": "192.168.1.1", "type": "router"},
{"name": "Router2", "ip": "192.168.1.2", "type": "router"},
{"name": "Switch1", "ip": "192.168.1.3", "type": "switch"},
{"name": "Switch2", "ip": "192.168.1.4", "type": "switch"},
{"name": "Ubuntu Server", "ip": "192.168.1.5", "type": "server"}
]
# Main script execution
def main():
"""Main function that runs the script"""
# Display header
print("=" * 60)
print(f"{'NETWORK LAB INFORMATION':^60}")
print("=" * 60)
print()
# Lab information
print(f"Lab Name: {LAB_NAME}")
print(f"Created by: {CREATOR}")
print(f"Creation Date: {CREATION_DATE}")
# Current date and time
current_time = datetime.datetime.now()
print(f"Current Time: {current_time}")
print()
# Network topology section
print("-" * 60)
print(f"{'NETWORK TOPOLOGY':^60}")
print("-" * 60)
print()
print("Devices in our topology:")
print()
# Display each device
for device in devices:
print(f" • {device['name']:15} | IP: {device['ip']:15} | Type: {device['type']}")
print()
print("=" * 60)
# This makes sure the script runs when executed directly
if __name__ == "__main__":
main()
Let me explain the structure because this is important. The very first line #!/usr/bin/env python3 is called a shebang. It tells Linux which interpreter to use. The triple quotes """ create a multi-line comment - perfect for documentation.
Constants (like LAB_NAME) are in uppercase by convention. The devices list contains dictionaries - we'll learn about these in detail later.
The def main(): defines a function called main. Everything indented under it belongs to this function. The if __name__ == "__main__": part is a Python idiom - it means "run the main() function only if this script is executed directly, not imported as a module."
Save this as network_info.py. Now let me show you different ways to run it:
1.Basic run:
python3 network_info.py
2.Make it executable and run directly:
chmod +x network_info.py
./network_info.py
The chmod +x makes the file executable (like giving it privilege 15 in Cisco terms).
3.Run with output redirection (save to file):
python3 network_info.py > network_report.txt
This > symbol redirects the output to a file instead of the screen.
4.Run and see output line by line:
python3 -u network_info.py
The -u flag forces unbuffered output - useful when watching script execution.
Now, let's create one more simple script to practice:
# Quick connectivity test script
import os
print("Testing connectivity to lab devices...")
print()
devices = ["192.168.1.1", "192.168.1.2", "192.168.1.3", "192.168.1.4"]
for ip in devices:
if response == 0:
print(f"✓ {ip} is reachable")
else:
print(f"✗ {ip} is NOT reachable")
Save this as ping_test.py and run it. This script uses the os module to run system commands. The ping command sends one packet (-c 1) with a 1-second timeout (-W 1). The > /dev/null 2>&1 redirects all output to nowhere (silent mode). If the ping succeeds, response gets 0; otherwise, it gets a non-zero value.
You've now created, saved, and run multiple Python scripts. Remember these key points:
1.Always use .py extension for Python files
2.Use descriptive names (not script1.py, script2.py)
3.Include comments to explain what your code does
4.Test your scripts frequently
5.Keep backups of working versions
This completes Lab 1. You've set up your environment, learned Python basics, and created your first network-related scripts. In the next lab, we'll build on this foundation with string operations that are essential for network configuration generation.