
Trunking in networking means combining multiple network links into one logical connection to boost bandwidth and simplify management. It uses protocols like IEEE 802.1Q for VLAN tagging, allowing traffic from different VLANs to share a single physical link. For example, when two switches need to exchange multiple VLANs, trunking avoids separate cables for each VLAN by tagging frames, making the setup efficient and cost-effective.
Trunking is widely used in enterprise networks and data centers to connect switches. It reduces cabling, supports VLAN communication, and ensures scalability, making networks more flexible and easier to manage.
In this article, we explain trunking in networking, its types, and benefits advantages. We have also covered trunking configurations, best practices and troubleshooting tips.
What is a Trunk in Computer Networks?
In computer networking, Trunks are the specialized network links that transport traffic for multiple VLANs between devices like Switches, Routers, or Firewalls across a single connection. They are essential for extending the reach of VLANs beyond individual switches and enabling communication between devices on different VLANs.
Trunk links typically use VLAN tagging to identify the specific VLAN each data packet belongs to, allowing multiple VLANs to coexist over the same physical link.
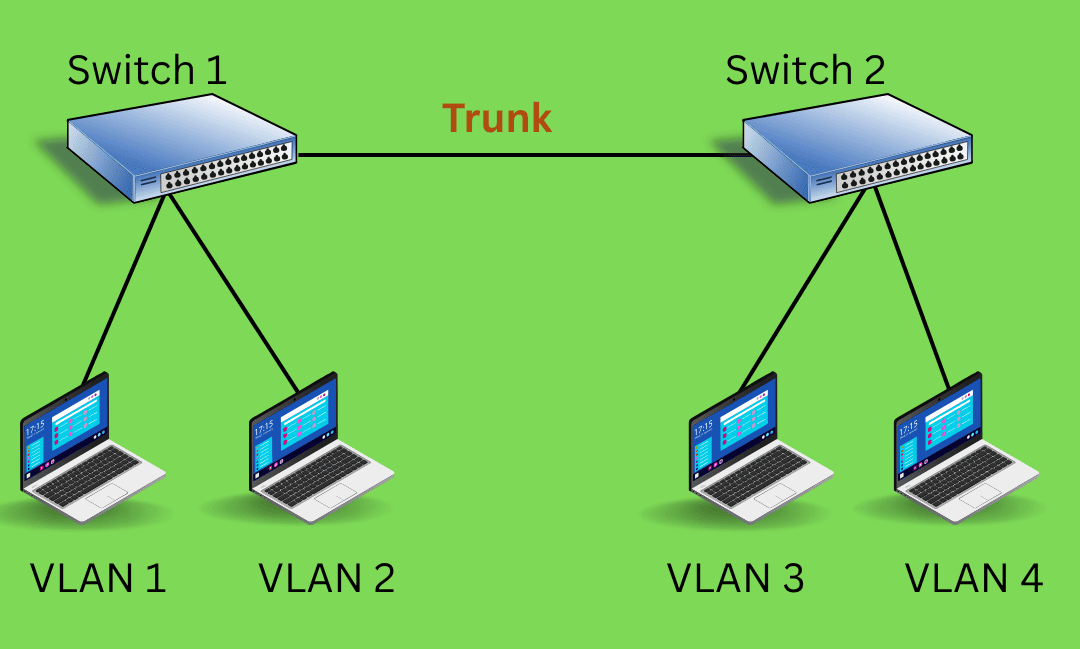
Look at the diagram below to understand where the trunk is formed in a computer network.
CCNA Training OnlineJoin the online course for CCNA certification.Explore course

Types of Trunking
Types of trunking include Link Aggregation, VLAN Trunking, and Port Trunking, each designed to increase bandwidth, enable VLAN communication, and improve network reliability.
1. VLAN Trunking
As discussed above, VLAN trunking is the most common type used in Ethernet networks. VLAN trunking allows multiple VLANs to be transmitted over a single physical link between switches, routers, or firewalls. It uses protocols like IEEE 802.1Q to tag packets with VLAN IDs, ensuring proper delivery across devices.
2. Telecom Trunking
In telecommunications, trunking allows the sharing of a group of lines or frequencies among multiple users. It’s used in telephone systems to route calls efficiently and in radio networks (like emergency services) to dynamically allocate channels based on demand.
3. Port Trunking (Link Aggregation)
Also known as EtherChannel or LACP (Link Aggregation Control Protocol), this type combines multiple physical links into one logical link to increase bandwidth and provide redundancy. It’s used between switches or between a switch and a server.
4. Wireless Trunking
Wireless trunking is used in enterprise networks where wireless access points (APs) connect to switches. These APs often support multiple SSIDs (Wi-Fi network names), each mapped to a different VLAN. Trunking allows all VLAN traffic from the APs to travel through a single cable to the switch.
How Does Trunking Work?
Trunking works by transmitting traffic from multiple VLANs over a single physical link using IEEE 802.1Q tagging. Each Ethernet frame is marked with a VLAN ID in its header, allowing switches to identify and route packets to the correct VLAN while maintaining isolation. The trunk link supports multiple VLANs simultaneously, eliminating the need for separate cables. This method improves bandwidth utilization, reduces hardware costs, and simplifies network design, making it essential for scalable enterprise networks.
Here is a step-by-step process of trunking in networking
1. Creating a Logical Link: Trunking combines multiple VLANs into a single logical link over one physical cable, reducing complexity and hardware costs.
2. VLAN Tagging with IEEE 802.1Q: Each Ethernet frame is tagged with a VLAN ID in its header using the IEEE 802.1Q protocol, enabling VLAN identification.
3. Encapsulation and Transmission: Tagged frames are encapsulated and transmitted across the trunk link, which supports multiple VLANs simultaneously.
4. Decoding at Destination: The receiving switch reads the VLAN tag and forwards the frame to the correct VLAN, maintaining isolation and proper routing.
Benefits of Trunking
1. It increases the available bandwidth for data transmission, enabling faster communication across the network.
2. It allows you to minimize the number of connections required between network devices.
3. Trunking makes it easier to scale. New VLANs or switches can be added without the need to run additional cables between devices.
4. Fewer cables and network connections mean lower costs for both infrastructure and maintenance.
Different Trunking Protocols
Trunking protocols are used to manage and optimize network traffic, especially when working with VLANs. Some trunking protocols are:
1. IEEE 802.1Q: This is the most widely used trunking protocol that inserts a tag into Ethernet frames to identify which VLAN the traffic belongs to. The tag is used to distinguish between the traffic from different VLANs on the same trunk link.
2. ISL (Inter-Switch Link): This Cisco-proprietary trunking protocol was used in older network setups but has since been largely replaced by IEEE 802.1Q.
3. VLAN Trunking Protocol (VTP): VTP is a Cisco proprietary protocol used to manage VLAN configurations across a network. It allows network administrators to add, delete, and rename VLANs, and these changes are propagated to all switches in the VTP domain.
4. Link Aggregation Control Protocol (LACP): Defined by IEEE 802.3ad, LACP combines multiple physical links into a single logical link to increase bandwidth and provide redundancy.
How to Configure VLAN Trunking on Cisco Switch?
Configuring trunking involves setting up a network link to carry traffic from multiple VLANs between switches or other networking devices. Here’s a step-by-step guide on how to configure trunking on Cisco switches.
This guide assumes you're using IEEE 802.1Q as the trunking protocol, which is the industry standard.
Step 1: Access the Switch's Command Line Interface (CLI)
Connect to the switch using a console cable or SSH (Secure Shell) to access the switch’s command line interface (CLI).
Step 2: Enter Global Configuration Mode
After logging in, enter privileged exec mode and then global configuration mode.
Step 3: Select the Interface to Configure as a Trunk
Choose the interface (port) you want to configure as a trunk. Typically, this is a port that connects to another switch or router.
Step 4: Configure the Port as a Trunk
Use the command to set the interface to trunk mode, which enables it to carry traffic from multiple VLANs.
Step 5: Set the Trunking Encapsulation (IEEE 802.1Q)
Cisco switches support two encapsulation types for trunking: ISL and IEEE 802.1Q. IEEE 802.1Q is the most commonly used. If it’s not already set, you can configure it using:
Note: On newer switches, IEEE 802.1Q is the default encapsulation, and this command might not be necessary.
Step 6: Allow Specific VLANs on the Trunk
By default, all VLANs are allowed on a trunk. However, you can restrict the trunk to specific VLANs if necessary.
Step 7: Verify the Configuration
To check if the trunk is configured correctly, use the following command:
This will display the trunk status and show which VLANs are allowed on the trunk.
Step 8: Save the Configuration
After configuring the trunk, don’t forget to save the configuration so it persists after a reboot.
Best Practices for Trunking
● Adopt industry-standard protocols like IEEE 802.1Q for VLAN tagging. This ensures compatibility across devices from different vendors.
● Configure trunk ports to carry only necessary VLANs using VLAN pruning. This minimizes unnecessary traffic and enhances security.
● Only enable trunking on ports requiring it and disable it on unused ports to reduce security risks. Use settings like Dynamic Trunking Protocol (DTP) sparingly or disable it to prevent unauthorized trunk negotiation.
● Assign a unique and unused VLAN as the native VLAN on trunk ports to prevent VLAN hopping attacks. Avoid using the default VLAN (VLAN 1) as the native VLAN.
● Enable Spanning Tree Protocol (STP) on trunk links to prevent broadcast storms and loops, ensuring network stability and redundancy.
● Maintain clear documentation of VLAN assignments and trunk configurations to simplify troubleshooting and future network changes.
By following these best practices, organizations can optimize their VLAN trunking setups to ensure efficient traffic management, robust security, and scalable network designs.
Troubleshooting Tips for Trunking Issues
1. Check Trunk Port Configuration
Ensure the interface is set to trunk mode using the command "switchport mode trunk". If it's mistakenly set to access mode, it won't carry multiple VLANs.
2. Verify VLAN Encapsulation
Confirm that the trunk uses the correct encapsulation type, typically IEEE 802.1Q. Use switchport trunk encapsulation dot1q if needed (note: some switches default to 802.1Q and may not require this).
3. Inspect Allowed VLANs on the Trunk
Use the show interfaces trunk command to check which VLANs are allowed. If the required VLANs are missing, add them using switchport trunk allowed vlan.
4. Check VLAN Existence and Status
Make sure the VLANs exist on both switches and are active. Use the show vlan brief command to verify that the VLANs are created and not in a shutdown state.
5. Verify Physical Connectivity and Cabling
Ensure the cable between switches is properly connected and functioning. A faulty cable or port can prevent trunking from working correctly.
Conclusion
Trunking plays a vital role in modern networking, especially in large-scale environments that rely on the use of VLANs for network segmentation. By enabling multiple VLANs to share the same physical connection, trunking simplifies network design, increases bandwidth, improves efficiency, and reduces costs.
As businesses continue to expand and require more complex networking solutions, trunking remains an essential technology that supports high-performance communication, network scalability, and flexibility. Understanding how to implement and optimize trunking in your network can help ensure smooth, fast, and cost-effective operations.

Deepak Sharma
Linkedin Profile: https://www.linkedin.com/in/uninets-deepak-sharma/ He is a senior solution network architect and currently working with one of the largest financial company. He has an impressive academic and training background. He has completed his B.Tech and MBA, which makes him both technically and managerial proficient. He has also ...
More... | Author`s Bog | Book a MeetingRelated Articles
#Explore latest news and articles
 11 Aug 2025
OSI Model in Computer Networks
Learn about the OSI model in computer networks and understand the working of 7 OSI layers. Discover its advantages and disadvantages and the differences from ...
 20 Mar 2025
What is Quality of Service (QOS) in Networking?
Learn about Quality of Service (QoS) in networking. Understanding its meaning, techniques, and best practices to implement quality of service.
 16 Dec 2024
Configuring 802.1x and Troubleshooting Commands
This Troubleshooting 802.1x command line document provides the step-by-step procedures define a client-server-based access control and authentication.
FAQ
What is the purpose of trunking?
Trunking aggregates multiple network connections into a single logical link, optimizing bandwidth, providing redundancy, and enabling efficient management and segmentation of network traffic, especially for VLANs and large-scale networks
What is VLAN trunking?
VLAN trunking allows multiple VLANs to traverse a single physical network link by tagging Ethernet frames, keeping VLAN traffic separate and organized, and enabling efficient communication between switches or routers
What are the 3 main types of trunking system?
The three main types of trunking systems are VLAN trunking (networking), IP trunking (voice/data integration), and port trunking (link aggregation for bandwidth and redundancy)
When to use trunking?
Trunking should be used when you need to transmit multiple VLANs over a single link, optimize bandwidth, provide redundancy, or manage large, segmented networks efficiently-such as between switches in enterprise or data center environments
Which are the 2 trunking protocols?
The two primary trunking protocols are IEEE 802.1Q (industry standard for VLAN tagging) and Cisco’s Inter-Switch Link (ISL), though 802.1Q is more widely used today
Comments (0)
Popular posts


What are the Different Types of Network ...
6 Jun 2026
What is the Syllabus for CCNA ...
20 Jan 2026
Transmission Media and Its Types in ...
6 Jun 2026
CCNA Exam Fees and Expenses Breakdown
25 Aug 2025Recent posts

Fortinet Firewall Interview Questions ...
6 Jun 2026
What are the Different Types of Network ...
6 Jun 2026
Transmission Media and Its Types in ...
6 Jun 2026
Computer Networks MCQs with Solutions to ...
6 Jun 2026
What is the Syllabus for CCNA ...
20 Jan 2026Upcoming batches


Contact learning advisor