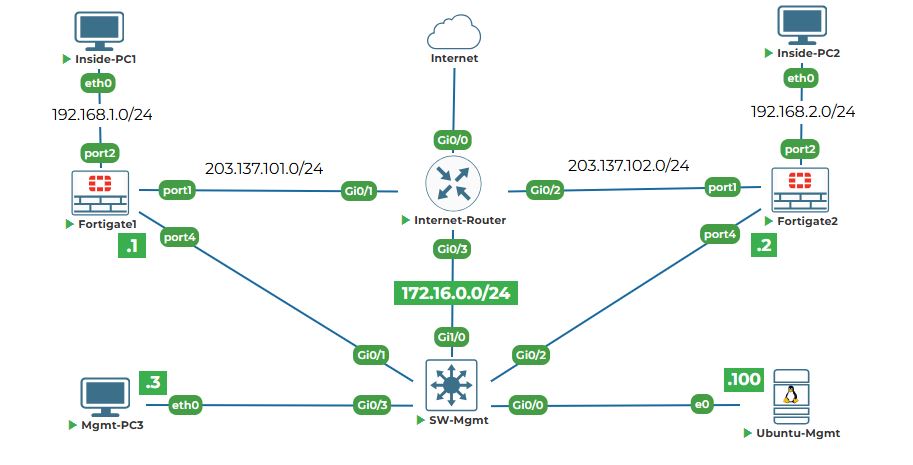
Objective: Configure IP addresses on the management interfaces of both FortiGates, set default routes, and verify connectivity from Ubuntu-Mgmt. Finally, access the web interfaces to prepare for GUI-based configuration.
Why are we doing this? Currently, our firewalls are isolated - they have no network connectivity. To manage them from Ubuntu-Mgmt (via SSH, web GUI, or API), they need IP addresses on the management network.
Note: In our case, we have chosen PORT4 on both FortiGate firewall as management port.
Task 4.1: On FortiGate-1, assign IP 172.16.0.1/24 to the mgmt (PORT4) interface.
Step 1: Enter interface configuration mode.
1. Go to your FortiGate-1 console tab (where you see the prompt FortiGate-1 #).
2. Type the following command to enter interface configuration:
config system interface
Explanation: This command takes you into the configuration mode for all network interfaces. The prompt will change to:
(FortiGate-1) #
Step 2: Select the port4 interface to configure.
1. Type:
edit port4
Explanation: The edit command selects a specific interface to configure. Here we're selecting the interface named "port4". The prompt changes again to show we're editing this specific interface:
FortiGate-1 (port4) #
Step 3: Set the IP address and netmask.
1. Type the following command:
set ip 172.16.0.1 255.255.255.0
Explanation: The set command configures a parameter. Here we're setting the ip parameter. Notice we use the subnet mask in dotted decimal format (255.255.255.0) instead of /24. This is how FortiOS expects it in the CLI.
Step 4: Configure allowed management access methods.
1. Type:
set allowaccess ping https http ssh
Explanation: This command is critical. It tells the firewall what types of management traffic to permit on this interface:
● ping: Allows us to test connectivity with ping commands.
● https: Allows web GUI access (what we'll use next).
● ssh: Allows secure command-line access.
Without this setting, even with the correct IP, you wouldn't be able to connect.
Step 5: Ensure the interface is enabled.
1. Type:
set status up
Explanation: This ensures the interface is administratively up (enabled). By default, interfaces might be down until explicitly enabled.
Step 6: Apply the configuration and exit.
1. Type:
end
Explanation: The end command exits configuration mode and applies all changes. You'll return to the main prompt FortiGate-1 #.
Task 4.2: On FortiGate-2, assign IP 172.16.0.2/24 to the port4 interface.
Step 1: Switch to FortiGate-2 console and repeat the process with the second IP.
1. Go to your FortiGate-2 console tab.
2. Enter interface configuration:
config system interface
3. Select the port4 interface:
edit port4
4. Set the IP address (note it's .2, not .1):
set ip 172.16.0.2 255.255.255.0
5. Allow management access:
set allowaccess ping https http ssh
6. Enable the interface:
set status up
7. Apply and exit:
end
Task 4.3: Verify from Ubuntu-Mgmt that both FortiGates are reachable.
Step 1: Go to your Ubuntu-Mgmt terminal.
1. Switch to the Ubuntu-Mgmt and open terminal window.
Step 2: Ping FortiGate-1.
1. Type:
ping -c 4 172.16.0.1
2. You should see replies like:
64 bytes from 172.16.0.1: icmp_seq=1 ttl=64 time=1.23 ms
64 bytes from 172.16.0.1: icmp_seq=2 ttl=64 time=1.18 ms
64 bytes from 172.16.0.1: icmp_seq=3 ttl=64 time=1.21 ms
64 bytes from 172.16.0.1: icmp_seq=4 ttl=64 time=1.19 ms
Step 3: Ping FortiGate-2.
1. Type:
ping -c 4 172.16.0.2
2. You should see similar successful replies.
Step 4: Troubleshoot if pings fail.
If either ping fails, wait a moment and try again. Sometimes interfaces take a few seconds to come up. If it continues to fail:
1. Double-check your IP configurations on the firewalls (go back to Task 4.1 and 4.2).
2. Verify the interface status on the firewall with:
show system interface port4
3. Make sure the cable connections in the topology are correct (port4 interface to SW-Mgmt).
Task 4.4: Access the FortiGate-1 Web UI from Firefox on Ubuntu-Mgmt.
Step 1: Access the graphical desktop of Ubuntu-Mgmt.
Step 2: Open Firefox.
1. Look at the top left sidebar of the Ubuntu desktop. You'll see firefox icon:
2. Click on the Firefox icon to launch the web browser.
Note: In case you are not able to click on the Firefox icon, then just open the terminal and type:
firefox&
Wait for few seconds and it will open firefox browser and its process will run in the background.
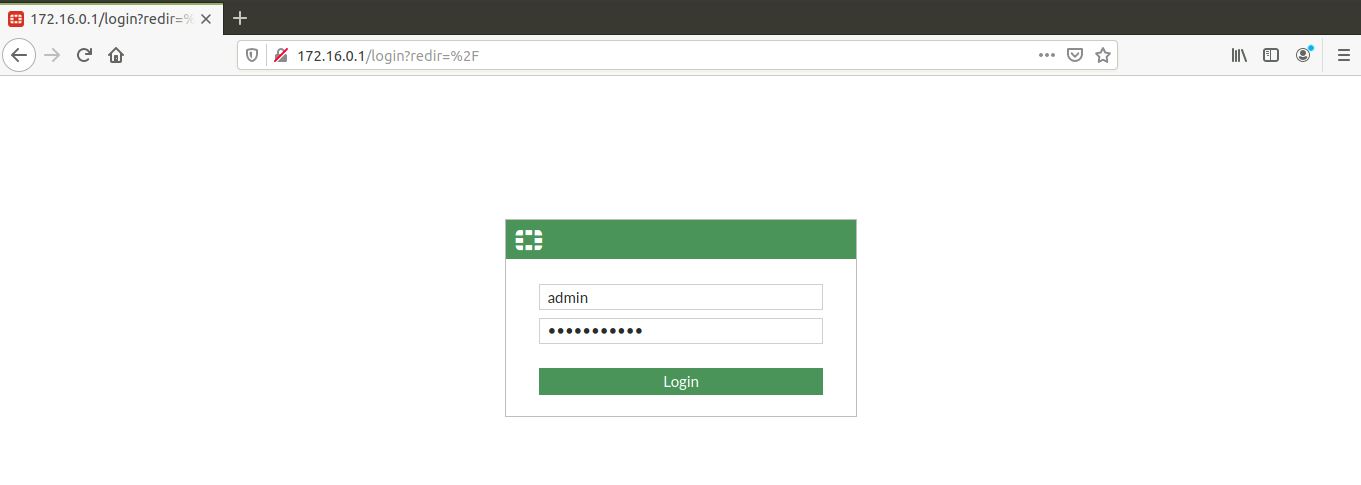
Step 3: Navigate to FortiGate-1's web interface.
1. In the Firefox address bar at the top, type:
http://172.16.0.1
2. Press Enter.
Step 4: Handle the security warning.
1. Your browser will show a warning page that says something like:
Warning: Potential Security Risk Ahead
Firefox detected a potential security threat and did not continue to 172.16.0.1.
Explanation: This warning appears because the firewall uses a self-signed certificate (like a homemade ID card) instead of a certificate from a trusted authority. In production, you'd use proper certificates, but for labs it's safe to ignore.
2. Click the Advanced button.
3. Click Accept the Risk and Continue (the exact wording might be "Proceed to 172.16.0.1 (unsafe)").
Step 5: Log in to FortiGate-1.
1. You'll see the FortiGate login page with fields for Username and Password.
2. Enter:
● Username: admin
● Password: uninets@123
3. Click Login or press Enter.
Note: For FortiGate setup, click on Later and click on OK.
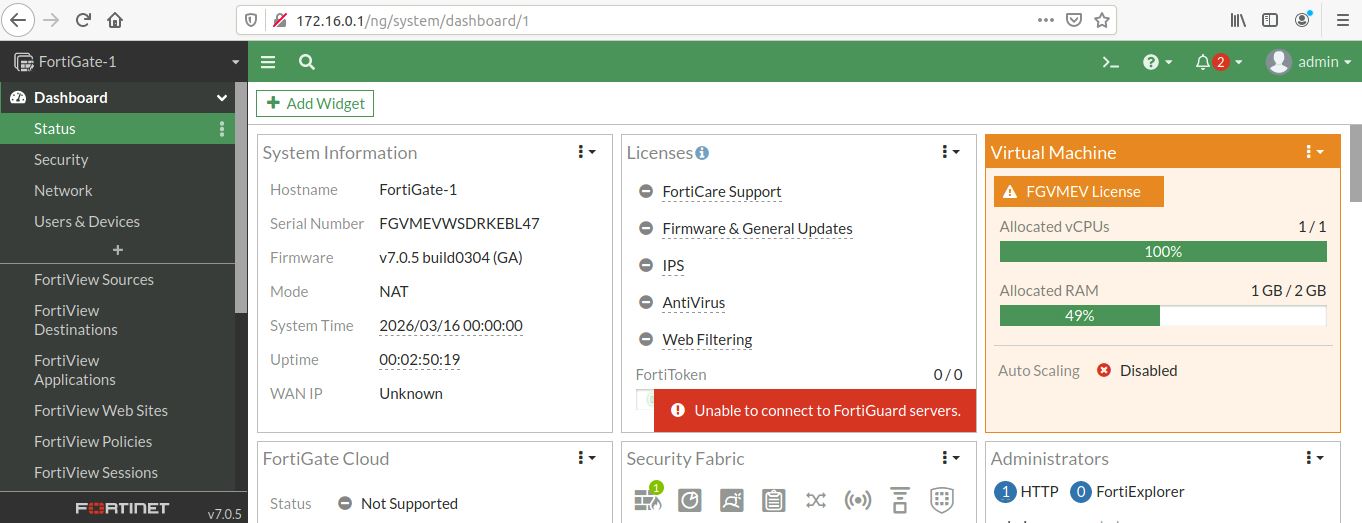
4. You are now in the FortiGate web interface! Take a moment to look around:
● The dashboard shows system status, interfaces, and recent events.
● The top menu has tabs like Dashboard, Security Fabric, System, Policy & Objects, etc.
● In the top right, you'll see the hostname "FortiGate-1" confirming you're on the right device.
Task 4.7: Access the FortiGate-2 Web UI from Firefox.
Step 1: Open a new tab in Firefox.
1. In the same Firefox window, click the + icon next to the current tab, or press Ctrl+T on your keyboard.
Step 2: Navigate to FortiGate-2.
1. In the new tab's address bar, type:
http://172.16.0.2
2. Press Enter.
Step 3: Accept the security warning again.
1. Click Advanced and then Accept the Risk and Continue.
Step 4: Log in to FortiGate-2.
1. Login with:
● Username: admin
● Password: uninets@123
2. Verify the hostname in the top right shows "FortiGate-2".
Step 5: Keep both tabs open.
You now have web access to both firewalls simultaneously. Throughout the labs, you'll switch between these tabs to verify configurations on both devices. This is much easier than using the console for everything!
