Objective: Log in to Ubuntu-Mgmt and configure its IP address so it can communicate with other devices on the management network.
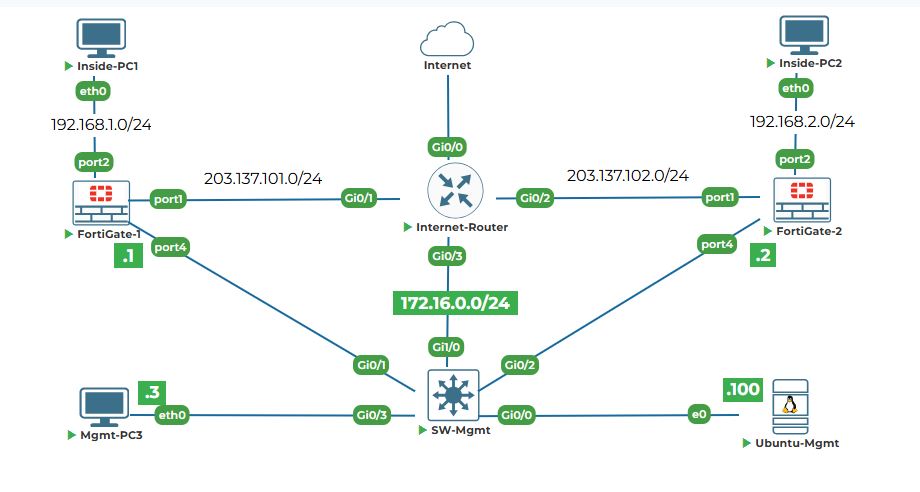
Why are we doing this? Ubuntu-Mgmt will be our "jump box" or management workstation for the entire lab. From here, we will access the firewalls via web browser, run Python scripts, execute Ansible playbooks, and make API calls. But first, it needs an IP address to talk to other devices. Think of this as giving your computer a valid address on the network so it can send and receive messages.
Task 2.1: Log in to Ubuntu-Mgmt.
Step 1: Look at your Ubuntu-Mgmt console tab.
1. You will see a login prompt asking for username and password.
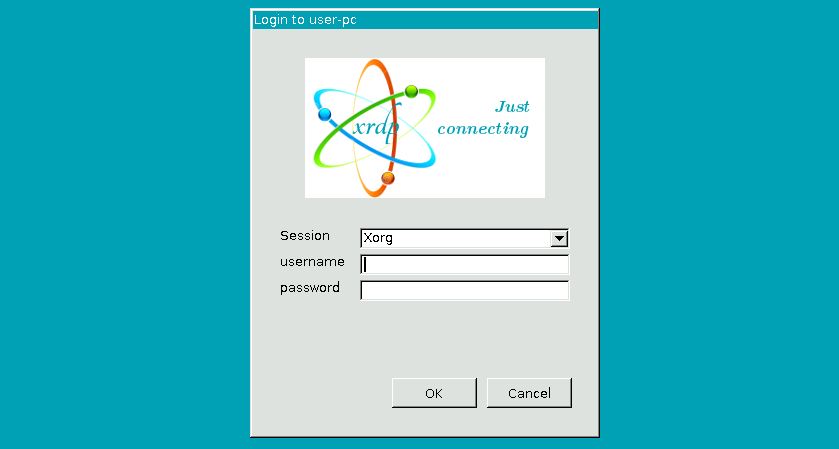
2. Type the username:
user
3. Type the password:
Test123
Click Ok to continue.
4. After successful login, you will see desktop GUI:

Task 2.2: Configure a permanent static IP address on Ubuntu-Mgmt.
Step 1: Check what network interfaces exist.
1. Right-click on the GUI desktop and select "open in terminal" and Type the following command:
ip link show
Explanation: The ip link show command displays all network interfaces on your system. "link" refers to the physical or virtual network connections.
2. You should see output similar to:
1: lo: <LOOPBACK,UP,LOWER_UP> mtu 65536 qdisc noqueue state UNKNOWN mode DEFAULT group default qlen 1000
link/loopback 00:00:00:00:00:00 brd 00:00:00:00:00:00
2: ens3: <BROADCAST,MULTICAST,UP,LOWER_UP> mtu 1500 qdisc fq_codel state UP mode DEFAULT group default qlen 1000
link/ether 00:50:00:00:08:00 brd ff:ff:ff:ff:ff:ff
3. Look for an interface named ens3 (or similar, like eth0). This is our main network interface connected to the management switch. Note the interface name for the next step.
Step 2: Permanently configure the static IP address using Netplan.
Important: The commands using ip addr add only set the IP temporarily until reboot. To make the change permanent, we need to edit the Netplan configuration file. Netplan is the default network configuration tool on modern Ubuntu versions.
1. First, navigate to the Netplan directory and list the configuration files:
cd /etc/netplan && ls -la
2. You should see a file named something like 01-network-manager-all.yaml. We'll edit this file with superuser privileges:
sudo nano 01-network-manager-all.yaml
Line-by-line explanation:
● cd /etc/netplan: Changes directory to where Netplan stores its configuration files.
● sudo: Stands for "super user do". It gives you administrator privileges to edit system files.
● nano: A simple text editor in the terminal.
● 01-network-manager-all.yaml: The network configuration file (your filename may vary).
3. Enter your password when prompted: Test123
4. The file will open in the nano editor. Modify its contents to configure a static IP. Replace any existing content with the following (using YAML syntax, which is space-sensitive):
# This file describes the network interfaces available on your system
# For more information, see netplan(5).
network:
version: 2
renderer: networkd
ethernets:
ens3: # Use the interface name you identified in Step 1 (ens3 or eth0)
dhcp4: no
addresses:
- 172.16.0.100/24
gateway4: 172.16.0.254
nameservers:
addresses: [8.8.8.8, 8.8.4.4]
Explanation of the configuration:
● dhcp4: no: Disables DHCP so we can use a static IP.
● addresses: Lists the static IP address and subnet mask (CIDR notation).
● gateway4: Sets the default gateway (the Internet-Router's management IP).
● nameservers: Configures DNS servers (Google's public DNS in this example).
5. Save the file in nano by pressing Ctrl+O, then press Enter to confirm the filename.
6. Exit nano by pressing Ctrl+X.
7. Now, apply the new network configuration permanently:
sudo netplan apply
Explanation: This command generates the backend configuration files and applies the new network settings immediately. The configuration will now persist across reboots.
8. If you encounter any syntax errors, you can test the configuration without applying it:
sudo netplan try
This will apply the configuration temporarily and ask for confirmation. If you don't confirm within 2 minutes, it will automatically revert, preventing you from getting locked out.
Step 3: Verify the IP configuration.
1. Check that the IP was assigned correctly:
ip addr show ens3
2. You should see output showing 172.16.0.100/24 listed under ens3 (or your interface name):
2: ens3: <BROADCAST,MULTICAST,UP,LOWER_UP> mtu 1500 qdisc fq_codel state UP group default qlen 1000
link/ether 00:50:00:00:08:00 brd ff:ff:ff:ff:ff:ff
inet 172.16.0.100/24 brd 172.16.0.255 scope global ens3
valid_lft forever preferred_lft forever
3. Verify the gateway and routing table:
ip route show
You should see a default route via 172.16.0.254.
4. To confirm the change is permanent, you can reboot the system and check again later:
sudo reboot
After reboot, log back in and run ip addr show ens3 to verify the IP address is still configured.
Task 2.3: Verify network connectivity from Ubuntu-Mgmt.
Step 1: Test connectivity to your own IP address.
1. Use the ping command to test your own network stack:
ping -c 4 172.16.0.100
Explanation: ping sends a small packet to an IP address and waits for a reply. The -c 4 flag means send only 4 packets (instead of continuously).
2. You should see output like:
PING 172.16.0.100 (172.16.0.100) 56(84) bytes of data.
64 bytes from 172.16.0.100: icmp_seq=1 ttl=64 time=0.036 ms
64 bytes from 172.16.0.100: icmp_seq=2 ttl=64 time=0.038 ms
64 bytes from 172.16.0.100: icmp_seq=3 ttl=64 time=0.041 ms
64 bytes from 172.16.0.100: icmp_seq=4 ttl=64 time=0.039 ms
--- 172.16.0.100 ping statistics ---
4 packets transmitted, 4 received, 0% packet loss, time 3051ms
This confirms your own network interface is working correctly. You're basically talking to yourself through the network stack.
Note: Use CTL+c to stop the ping output.
Step 2: Test connectivity to the Internet-Router's management interface.
1. Ping the router's IP address (which is the default gateway for the management network):
ping -c 4 172.16.0.254
2. You should see similar successful replies:
64 bytes from 172.16.0.254: icmp_seq=1 ttl=255 time=1.23 ms
64 bytes from 172.16.0.254: icmp_seq=2 ttl=255 time=1.18 ms
...
If you see replies, congratulations! This confirms three things are working:
● Ubuntu-Mgmt is properly configured with the correct permanent IP address.
● The management switch (SW-Mgmt) is functioning and forwarding traffic.
● The Internet-Router is powered on and its management interface is reachable.
Step 3: Troubleshoot if ping fails.
If you don't see replies, wait a minute and try again. Some devices take time to boot up completely. If it still fails:
1. Verify your IP configuration again:
ip addr show ens3
2. Make sure the interface is up:
ip link show ens3 | grep state
You should see state UP in the output.
3. Check the Netplan configuration file for YAML syntax errors (indentation is critical in YAML):
sudo netplan --debug generate
4. Check that you typed the ping command correctly (172.16.0.254, not 172.16.0.254/24).
