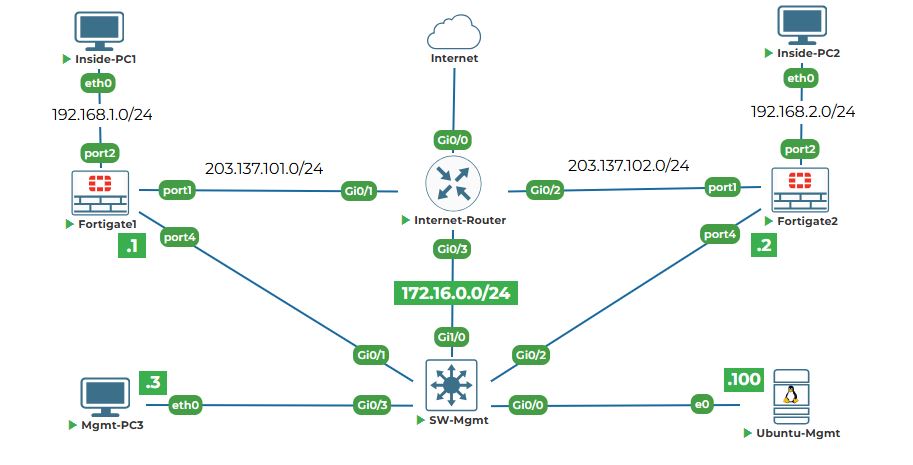
Objective: Perform factory reset on both FortiGates, accept the license agreement, and set meaningful hostnames to identify each device.
Why are we doing this? The lab environment provides firewalls with default configurations, but we want to start from a completely clean state to ensure consistency and avoid any leftover settings from previous exercises. Setting hostnames helps us identify which firewall we're working on - imagine trying to manage two identical devices without names! It's like naming your computers "Office-PC" and "Home-PC" instead of just "Computer".
Task 3.1: Perform factory reset on both FortiGates.
Step 1: Log in to FortiGate-1 console.
1. Go to your FortiGate-1 console tab.
2. At the login prompt, type the default username:
admin
3. Press Enter.
4. For password, just press Enter (default password on factory reset devices is blank).
5. It will force you the set the new password. Enter new password (here we are using uninets@123):
uninets@123
confirm password and you will see the prompt FortiGate-VM64-KVM #
Note: In our case, firewalls are already in factory default so you can skip the Step 2 to Step 5.
Step 2: Execute the factory reset command on FortiGate-1.
1. Type the following command:
execute factoryreset
Explanation: The execute command tells the firewall to perform an action. factoryreset is the specific action - it will wipe all configurations and return the device to its original state, just like when it first came out of the box.
2. The firewall will ask for confirmation:
This operation will reset the device to factory default and reboot! Do you want to continue? (y/n)
3. Type y (for yes) and press Enter:
y
4. The firewall will display messages showing the reset process and then reboot. This takes about 2-3 minutes.
Step 3: Perform factory reset on FortiGate-2.
1. Switch to your FortiGate-2 console tab.
2. Login with username admin and press Enter for password.
3. Type the same factory reset command:
execute factoryreset
4. Confirm with y when prompted.
5. Wait for FortiGate-2 to reboot as well.
Step 4: Handle password change prompt.
1. After accepting the license, the firewall will ask you to change the admin password:
Please change the password for admin administrator login.
New password:
2. Since this is a lab environment and we want to keep things simple, just press Enter to leave it blank.
3. It will ask for confirmation:
Confirm password:
4. Press Enter again.
5. You might see a warning:
Password change failed: Password is null. Please choose a different password.
If you see this, just press Enter a few times to accept the default empty password. The firewall will eventually let you proceed to the CLI prompt.
Step 5: Repeat for FortiGate-2.
1. Switch to FortiGate-2 console tab.
2. Login with admin and no password.
3. Press spacebar to scroll through the license agreement.
4. Type accept when prompted.
5. Press Enter twice to skip password change (or handle the warning similarly).
Task 3.3: Set the hostname for FortiGate-1.
Step 1: Enter configuration mode.
1. On FortiGate-1 console, at the command prompt (still showing the serial number), type:
config system global
Explanation: This command enters the configuration mode for global system settings. The prompt will change to show you're in config mode:
FortiGate-VM64-KVM (global) #
Step 2: Set the hostname.
1. Type the following command:
set hostname FortiGate-1
Explanation: The set command changes a specific setting. Here we're setting the hostname parameter to the value FortiGate-1.
2. No confirmation message will appear - that's normal. The change is accepted silently.
Step 3: Exit configuration mode.
1. Type:
end
Explanation: The end command exits configuration mode and returns you to the regular CLI prompt. You'll immediately notice the prompt has changed to your new hostname:
FortiGate-1 #
This confirms the hostname change was successful!
Task 3.4: Set the hostname for FortiGate-2.
Step 1: Switch to FortiGate-2 console and repeat the process.
1. Go to your FortiGate-2 console tab.
2. Enter configuration mode:
config system global
3. Set the hostname:
set hostname FortiGate-2
4. Exit configuration mode:
end
5. Verify the prompt now shows:
FortiGate-2 #
Step 2: Verify both hostnames are set correctly.
1. On FortiGate-1, type:
get system status | grep Hostname
You should see: Hostname: FortiGate-1
2. On FortiGate-2, type the same command:
get system status | grep Hostname
You should see: Hostname: FortiGate-2
Now both firewalls have meaningful names. This small step will make a big difference as we work with multiple devices - you'll always know which one you're configuring just by looking at the command prompt.