Objective: Access the firewalls' graphical management interface (WebUI), perform essential initial setup (hostname, timezone), and commit the configuration. This is the last time we will configure things manually before moving to automation.
Why are we doing this? While we can do everything via API, the WebUI is intuitive for beginners to verify settings. We need to set hostnames so we can easily identify our devices later.
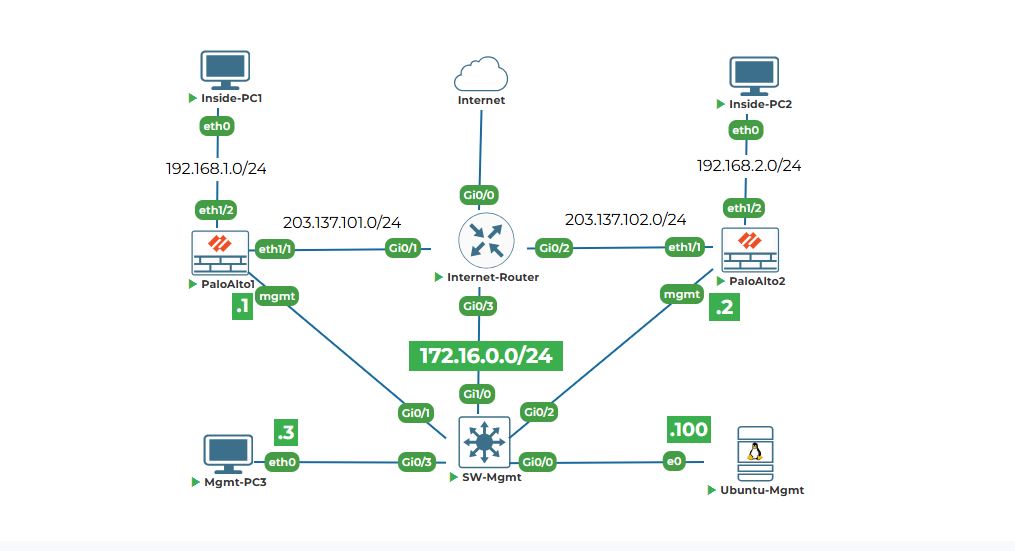
Task 1: Access PaloAlto1 and PaloAlto2 web interface from Ubuntu-Mgmt browser.
Step 1: Open a Web Browser.
On your Ubuntu-Mgmt desktop, click on the "Firefox" icon on the top left corner or open a new terminal and type firefox then firefox browser will open.
Step 2: Connect to PaloAlto1.
1. In the browser's address bar at the top, type the following and press Enter:
https://172.16.0.1
It may take 2-5 minutes to open GUI
● https:// is important. The firewall uses a secure connection.
● 172.16.0.1 is the IP address we just configured for PaloAlto1.
2. You will see a security warning. This is normal and expected. The firewall uses a self-signed certificate (like a homemade ID card), so your browser doesn't trust it automatically.
● In Firefox, click "Advanced..." and then click "Accept the Risk and Continue".
3. The Palo Alto Networks login page will load. For the username, type admin. For the password, type the one you set during the console login Uninets@123. Click Login.
Step 3: Connect to PaloAlto2.
1. Open a new tab in your browser.
2. In the address bar, type:
https://172.16.0.2
It may take 2-5 minutes to open GUI
3. Accept the security warning again.
4. Log in with the same credentials (admin / Uninets@123).
5. You now have two browser tabs: one managing PaloAlto1 and one for PaloAlto2. Keep both open.
Task 2: Perform initial setup (hostname, timezone).
We will do this on PaloAlto1 first, then repeat the same steps on PaloAlto2.
Step 1: Navigate to Device -> Setup.
1. In the PaloAlto1 tab, look at the top menu. Find and click on Device.
2. A menu will show on the left panel. Click on Setup under the Device section.
Step 2: Change the Hostname.
1. On the Setup page, look for the "General Settings" under management tab and click on edit gear icon.
2. Find the field labeled "Hostname". It may be either blank or filled with PA-VM.
3. Click in the box and change it to paloalto1. This gives our device a unique, identifiable name.
Step 3: Set the Timezone.
1. In the same "General Settings" section, under management tab and click on edit gear icon, find the "Time Zone" dropdown menu.
2. Click on it and scroll to select your location. For example, select (GMT-05:00) America/New_York or a timezone relevant to you. Accurate time is critical for logging and security policies.
3. Click on OK
Note: You may have to zoom out (CLT - ) the browser to see the OK button in the popup.
Step 4: (Optional) Update the DNS Servers.
1. Go to Devices > Setup > Services and click on gear icon to edit.
2. Find "Primary DNS Server". Click in the box and type 8.8.8.8 and secondary as 4.2.2.2 (Google's DNS). This allows the firewall to resolve hostnames (like for license activation or dynamic updates).
3. Click on OK
Note: You may have to zoom out (CLT - ) the browser to see the OK button in the popup.
Step 5: Repeat for PaloAlto2.
1. Switch to your browser tab for PaloAlto2 (https://172.16.0.2).
2. Go to Device > Setup > General Setting click on edit (gear icon)
3. Set the Hostname to paloalto2
4. Set the same Time Zone.
5. Set the Primary DNS Server to 8.8.8.8 and secondary as 4.2.2.2
6. Click on OK at the bottom.
Task 3: Commit and verify basic connectivity.
Committing is the final step to make all our changes (hostname, timezone) active on the firewall's running configuration.
Step 1: Commit on PaloAlto1.
1. In the PaloAlto1 tab, look at the top right corner of the WebUI. There is a commit toolbar, click on it. A commit window will open. It lists all the changes we've made.
2. In the commit window, click the blue Commit button.
3. You will see a progress bar. Wait for it to complete and show a message like "Commit completed successfully". This may take 30-60 seconds. Close the commit window.
Step 2: Commit on PaloAlto2.
1. Switch to the PaloAlto2 tab. Click the Commit button in the toolbar.
2. Click Commit in the commit window and wait for it to complete.
Step 3: Verify Connectivity from Ubuntu.
1. Go back to your Ubuntu terminal.
2. Let's ping the firewalls again, but this time we'll also test that they can reach the internet (their DNS and gateway). First, ping PaloAlto1:
ping -c 2 172.16.0.1
You should get replies.
3. Now, ask the firewall to ping an external website to verify its connectivity. We'll use the API-like CLI via SSH. Type:
echo -e "set cli pager off\nping source 172.16.0.1 count 2 host www.uninets.com\nexit" | ssh -tt admin@172.16.0.1
● echo -e: This tells the Ubuntu shell to enable interpretation of backslash escapes.
● set cli pager off: Disables the "--- more ---" prompt so the output flows continuously.
● \n: This represents a New Line. Since you cannot "press enter" inside a single string, the \n simulates hitting the Enter key after each command.
● ping source 172.16.0.1 count 2 host www.uninets.com: The operational command you want to run.
● exit: Closes the Palo Alto CLI session once the ping is finished so the SSH tunnel collapses automatically.
● -tt: This is the most critical part for Palo Alto. It forces the allocation of a pseudo-terminal. Without this, the Palo Alto CLI realizes it isn't a "real person" typing and often refuses to execute commands or hangs on the login banner.
● admin@172.16.0.1: Your login credentials and the Management IP of the firewall.
● ping source 172.16.0.1 tells it to ping from its management IP.
● host www.google.com is the target. If DNS is working, it will resolve to an IP.
● count 2 sends only 2 packets.
4. It will ask for a password. Type Uninets@123 and press Enter.
5. You should see output showing successful pings from the firewall to Google. This proves:
● Your SSH connection works (important for later).
● The firewall's DNS (8.8.8.8) is working.
● The firewall's default gateway (172.16.0.254) is working and providing internet access.
Step 4: Verify Hostname Change.
Let's also verify the hostname change took effect using SSH. In the terminal, type:
echo -e "set cli pager off\nshow system info\nexit" | ssh -tt admin@172.16.0.1
Enter the password when prompted. Look at the first line of the output. It should now say hostname: paloalto1. Perfect!
