Objective: Physically configure the management IP addresses on both Palo Alto firewalls and the Ubuntu management PC so we can reach the firewalls from Ubuntu-Mgmt.
Why are we doing this? The firewalls are brand new, with no IP configuration. The only way to talk to them initially is through the physical console port. In our lab, we will get the firewall (or any device) console by left click on the firewall. The console will open on the next tab of the browser.
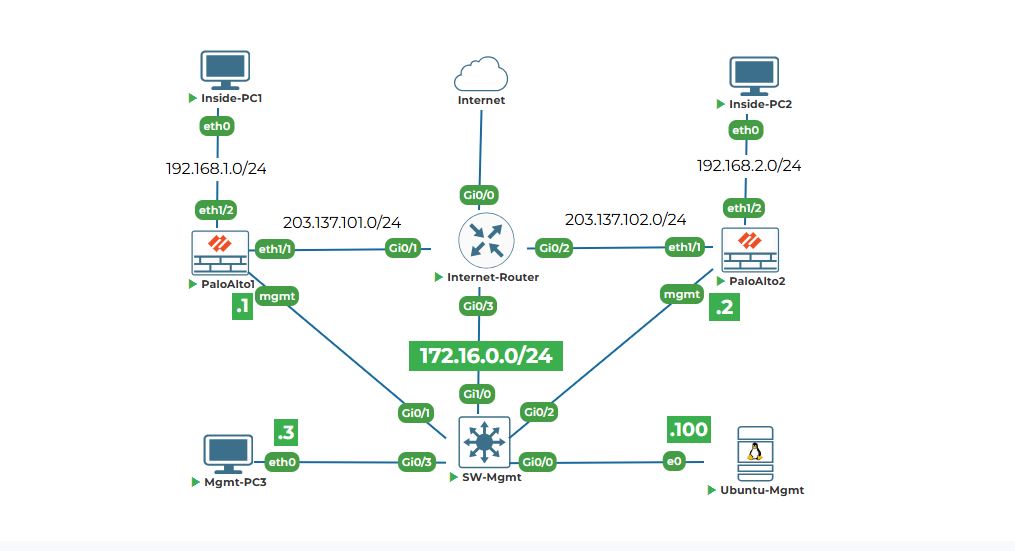
Topology Focus: We are working with the Mgmt network (172.16.0.0/24).
PaloAlto1 mgmt interface needs: 172.16.0.1/24
PaloAlto2 mgmt interface needs: 172.16.0.2/24
Ubuntu-Mgmt eth0 interface needs: 172.16.0.100/24
Task 1: Configure management IP on PaloAlto1 (172.16.0.1/24) via console.
Step 1: Log in and Enter Configuration Mode.
1. Click on PaloAlto1, its console will open in next tab. You will see the Palo Alto login prompt. It might look blank. Press Enter a couple of times.
2. You should see:
login:
Type admin and press Enter.
3. It will ask for a password. For a new firewall, the default password is admin. Type admin and press Enter.
You will likely be forced to change it immediately. Follow the prompts to set a new password. Remember it! Let's assume you set it to Uninets@123 for these labs.
4. You are now at the Operational Command Line, or > prompt. This is for checking status and running tests. To configure the device, we need to go into Configuration Mode. Type this command and press Enter:
configure
Your prompt will change from > to #. This # means you are now in configuration mode. Be careful here, changes are made live but not saved permanently yet.
Step 3: Set the Management Interface IP Address.
1. We need to go into the settings specifically for the management interface. Type this command and press Enter:
set deviceconfig system type static
set deviceconfig system ip-address 172.16.0.1 netmask 255.255.255.0
Let's break this down:
● set is the command to configure something.
● deviceconfig system is the path to the system settings.
● type static is to set the static ip to the management interface
● ip-address 172.16.0.1 is the parameter and the value we want.
● netmask 255.255.255.0 sets the subnet mask to /24.
Step 4: Set the Default Gateway for Management.
Our management traffic needs to know how to get to other networks (like our Ubuntu PC if it's on a different subnet, but in this case, it's on the same one). The gateway for the management network, according to the topology, is the Cisco router's interface Gi0/3 with IP 172.16.0.254. We set this as the default route for management. Type this command and press Enter:
set deviceconfig system default-gateway 172.16.0.254
Step 5: Save (Commit) the Configuration.
In Palo Alto, changes in config mode are candidate changes. To make them active and permanent, you must commit. Type this command and press Enter:
commit
You will see a series of messages as the firewall validates and applies the configuration. Wait for it to say Configuration committed successfully.
Step 6: Exit and Test.
1. Type exit to leave configuration mode (prompt goes back to >).
2. Let's test if our IP is set. Type this command and press Enter:
show deviceconfig system
Task 2: Configure management IP on PaloAlto2 (172.16.0.2/24) via console.
Step 1: Connect to PaloAlto2 Console.
1. Log in with admin and the password (if it's new, use admin and change it. Use the same password Uninets@123 for consistency).
2. Type configure to enter config mode (# prompt).
3. Set the IP address. This time, use .2. Type and press Enter:
set deviceconfig system type static
set deviceconfig system ip-address 172.16.0.2 netmask 255.255.255.0
4. Set the default gateway (it's the same router). Type and press Enter:
set deviceconfig system default-gateway 172.16.0.254
5. Commit the changes. Type and press Enter:
commit
6. Verify. Type exit to go to > prompt, then:
show deviceconfig system
Task 3: Configure Ubuntu-Mgmt IP (172.16.0.100/24) via GUI.
Why GUI? Since Ubuntu is a desktop, it's easier for beginners to set the IP using the graphical network manager. Left click on Ubuntu-Mgmt and it's GUI will open on the next tab. Username is user and password is Test123
Step 1: Open Network Settings.
1. On your Ubuntu desktop, look at the top-right corner of the screen. You will see a network icon (like two arrows or a WiFi symbol). Click on it.
2. From the menu that appears, click "Edit Connections" then double click on Wired Connection1, This will open the Network settings window.
Note: Make sure SW-Mgmt is powered on
Step 2: Configure the Wired Connection.
1. A new window titled "Editing Wired Connection 1" will open. Click on the "IPv4" tab at the top.
2. You will see a method dropdown. It probably says "Automatic (DHCP)". Click on it and change it to "Manual".
3. New fields will appear: Address, Netmask, Gateway.
● Click the "Add" button next to Address.
● In the first box, type your IP address: 172.16.0.100
● In the netmask box, type: 255.255.255.0 (or you can just type 24).
● In the gateway box, type: 172.16.0.254
4. You can also add DNS servers. In the "DNS" field, you can type 8.8.8.8 (Google's public DNS).
5. Click the green "Apply" button at the top-right of the window.
Step 3: Turn the Connection Off and On.
To make sure the new settings take effect, we need to restart the connection. In the main Network window, find the switch next to your "Wired" connection. Toggle it OFF, wait a second, and then toggle it ON again.
Task 4: Verify connectivity from Ubuntu-Mgmt to both firewalls using ping.
Step 1: Open a Terminal.
Right click on the Ubuntu-Mgmt desktop and select "Open in Terminal".
Step 2: Ping PaloAlto1.
1. We will use the ping command to send a small test packet to the firewall. Type this command and press Enter:
ping -c 4 172.16.0.1
● ping is the command.
● -c 4 tells it to send only 4 packets and then stop (so it doesn't ping forever).
● 172.16.0.1 is the target IP (PaloAlto1).
2. You should see output like this:
PING 172.16.0.1 (172.16.0.1) 56(84) bytes of data.
64 bytes from 172.16.0.1: icmp_seq=1 ttl=64 time=0.456 ms
64 bytes from 172.16.0.1: icmp_seq=2 ttl=64 time=0.389 ms
64 bytes from 172.16.0.1: icmp_seq=3 ttl=64 time=0.411 ms
64 bytes from 172.16.0.1: icmp_seq=4 ttl=64 time=0.402 ms
This means packets are going out and getting a reply. Success!
Step 3: Ping PaloAlto2.
Now test the second firewall. Type this command and press Enter:
ping -c 4 172.16.0.2
You should see similar successful replies. If you do, congratulations! Your management network is now operational.
What if ping fails?
● Check your IP configuration on Ubuntu again.
● Did you commit the configuration on the firewalls?
● Is SW-Mgmt switch powered on?
Use ifconfig or ip a command in Ubuntu terminal to check your ens3 IP address.
