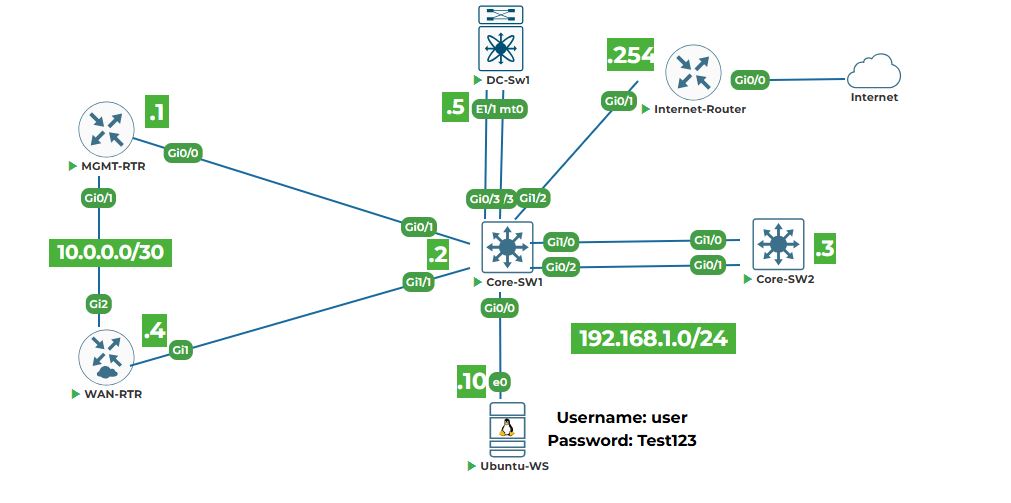
Objective: Introduce the basic Linux command‑line operations essential for network automation. You will learn to navigate the filesystem, manage files and directories, work with environment variables, write simple Bash scripts, and use pipes and redirection. All tasks are performed on the Ubuntu‑WS workstation (20.04) from the lab topology.
Why are we doing this? The Ubuntu workstation is the central control point for all automation tasks in this course. Understanding the Linux command line is a prerequisite for running Python scripts, using Git, managing Docker containers, and operating tools like Ansible and Terraform.
Task 1: Navigate the Filesystem
Open a terminal on Ubuntu‑WS. You can do this by right-click on GUI desktop and select "Open in Terminal"
Step 1: Discover your current location
The command pwd (print working directory) shows the absolute path of the directory you are in.
pwd
Expected output (example):
/home/user
Step 2: List files and directories
The ls command lists contents. Common options:
ls -l– long format with permissions, size, modification date.ls -a– show all files, including hidden ones (starting with .).ls -la– combination of both.
ls -la
Observe the output: you’ll see directories like . (current), .. (parent), and files with permissions (-rw-r--r-- etc.).
Step 3: Change directories
Use cd (change directory) to move around.
# absolute path
cd /tmp
# verify you are in /tmp
pwd
# go to your home directory (shortcut)
cd ~
# go back to the previous directory (/tmp)
cd -
Relative paths are based on your current location. For example, if you are in /home/user, typing cd Documents will take you to /home/user/Documents if it exists.
Step 4: Use tab completion
Type cd /etc and press Tab twice – it shows available subdirectories. This saves time and avoids typos.
Task 2: File and Directory Management
Step 1: Create directories
Make a new directory with mkdir. Use -p to create parent directories as needed.
cd ~
mkdir test_dir
mkdir -p parent/child
Verify with ls -l.
Step 2: Create empty files with touch
touch file1.txt file2.txt
You can also create a file with content using redirection:
echo "Hello, automation" > file3.txt
Step 3: Copy, move, and remove files/directories
cp source destination– copy a file. Use-rfor directories.mv source destination– move or rename.rm file– remove file. Use-rfor directories (be careful!).
cp file1.txt file1_copy.txt
# move into subdirectory
mv file2.txt test_dir/
rm file1_copy.txt
# remove directory and its contents
rm -r test_dir
Always double‑check before using rm -r; there is no trash bin in the terminal.
Task 3: View and Edit Files
Step 1: View file contents
cat filename– prints entire file to screen.less filename– view page by page (press q to quit).head -n 5 filename– first 5 lines.tail -n 5 filename– last 5 lines.
echo "Line1\nLine2\nLine3\nLine4\nLine5" > sample.txt
cat sample.txt
head -n 2 sample.txt
tail -n 2 sample.txt
Step 2: Edit files with nano
If nano is not installed, install it:
sudo apt update
sudo apt install nano -y
Create and edit a new file:
nano mynotes.txt
Type some text (e.g., "Learning Bash commands"). To save: Ctrl+O, then Enter. To exit: Ctrl+X.
Task 4: Environment Variables
Step 1: View existing variables
# show all environment variables
env
# show value of PATH variable
printenv PATH
# another way (the $ is important)
echo $HOME
The PATH variable tells the shell where to look for executable programs.
Step 2: Set a temporary variable
export MY_VAR="CiscoAutomation"
echo $MY_VAR
This variable exists only in the current terminal session. To make it permanent, add the line export MY_VAR="CiscoAutomation" to the file ~/.bashrc and then run source ~/.bashrc.
Step 3: Use a variable in a command
echo "The course is $MY_VAR"
# creates a directory named CiscoAutomation
mkdir $MY_VAR
Task 5: Bash Scripting Basics
A Bash script is a text file containing commands that are executed sequentially.
Step 1: Create a simple script
nano firstscript.sh
Type the following:
#!/bin/bash
# This is a comment
echo "Current directory: $(pwd)"
echo "Home directory: $HOME"
echo "My variable: $MY_VAR"
#!/bin/bash is called a shebang – it tells the system which interpreter to use.
Step 2: Make the script executable and run it
chmod +x firstscript.sh
./firstscript.sh
You should see output showing your current directory, home, and the value of MY_VAR.
Task 6: Pipes and Redirection
Step 1: Use pipes (|) to chain commands
The pipe takes the output of the left command and feeds it as input to the right command.
# find lines containing "network"
ls -la /etc | grep network
# find the process with name "python"
ps aux | grep python
Step 2: Redirect output to a file
>– overwrite the file.>>– append to the file.
echo "First line" > output.txt
echo "Second line" >> output.txt
cat output.txt
Step 3: Use tee to see output and save to file simultaneously
echo "Hello, tee" | tee teefile.txt
cat teefile.txt
Task 7: Permissions and Processes
Step 1: View and change file permissions
Each file has permissions for owner, group, and others. ls -l shows them (e.g., -rw-r--r--).
touch permtest.txt
ls -l permtest.txt
# add execute permission for everyone
chmod +x permtest.txt
# set to rw------- (owner only)
chmod 600 permtest.txt
Step 2: Run a command in the background
# runs in background, returns job ID
sleep 100 &
# list background jobs
jobs
# bring job 1 to foreground (press Ctrl+C to stop)
fg %1
Step 3: Kill a process
Find the process ID (PID) and terminate it.
sleep 200 &
# note the PID
ps aux | grep sleep
# gracefully terminate
kill <PID>
# force kill if needed
kill -9 <PID>
You have now completed Lab 1 and gained the essential Linux command‑line skills needed for the rest of the course. In the next lab, you will learn version control with Git.