Step 1: Preconfigured Edge Router
The Edge router is preconfigured, Interface Gi0/0 is receiving an IP via DHCP from the Internet, and NAT is enabled for traffic going from Gi0/1 (Inside) to the Internet via Gi0/0 (Outside).
On Edge Router:
!
enable
!
configure terminal
!
hostname Edge
!
no cdp run
!
ip dhcp excluded-address 192.168.1.1 192.168.1.25
!
ip dhcp pool INT-LAB
network 192.168.1.0 255.255.255.0
domain-name uninets.com
dns-server 8.8.8.8 4.2.2.2
default-router 192.168.1.1
!
enable secret Un1nets#2015
username uninets secret Un1nets#2015
!
interface Gi0/0
no shut
description connect-to-Internet-switch
!
interface Gi0/0.201
description connect-to-Internet-switch-vlan201
encapsulation dot1Q 201
ip address dhcp
ip nat outside
!
interface Gi0/1
description connect-to-Core
ip address 192.168.1.1 255.255.255.0
mac-address aaaa.aaaa.aa11
ip access-group LAB-SUBNET in
ip nat inside
no shut
!
ip access-list extended LAB-SUBNET
deny ip any 192.168.201.0 0.0.0.255
deny ip any 192.168.202.0 0.0.0.255
deny ip any 192.168.203.0 0.0.0.255
deny ip any 192.168.204.0 0.0.0.255
deny ip any 192.168.10.0 0.0.0.255
deny ip any 192.168.50.0 0.0.0.255
deny ip any 192.168.150.0 0.0.0.255
permit ip any any
!
ip nat inside source list 1 interface Gi0/0.201 overload
!
access-list 1 permit 192.168.1.0 0.0.0.255
!
line con 0
logging synchronous
line aux 0
line vty 0 4
login local
transport input ssh
!
end
!
write
!
You can verify whether this Edge router is receiving an IP address via DHCP from the Internet or not.
show ip interface brief

Note: If your assigned lab server is S1 (check your browser it should be s1.uninets.com), then dynamic IP will be received on interface Gi0/0 instead of Gi0/0.201. Please contact support@uninets.com in case you face issues in this task.
Step 2: OWAP Server Setup
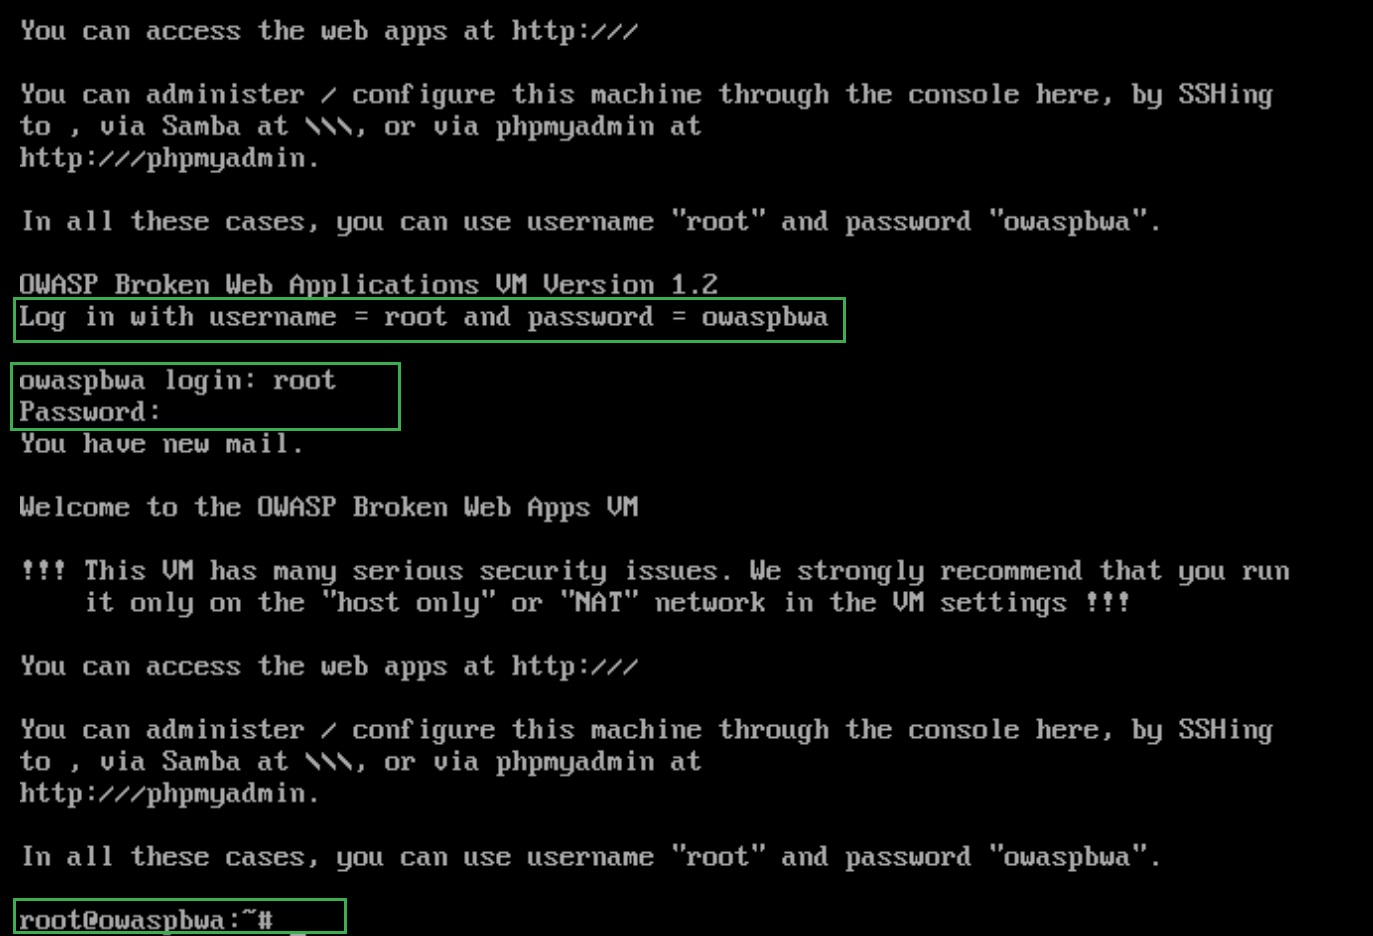
Log in to the OWAP Server using the default username and password (root/owaspbwa)
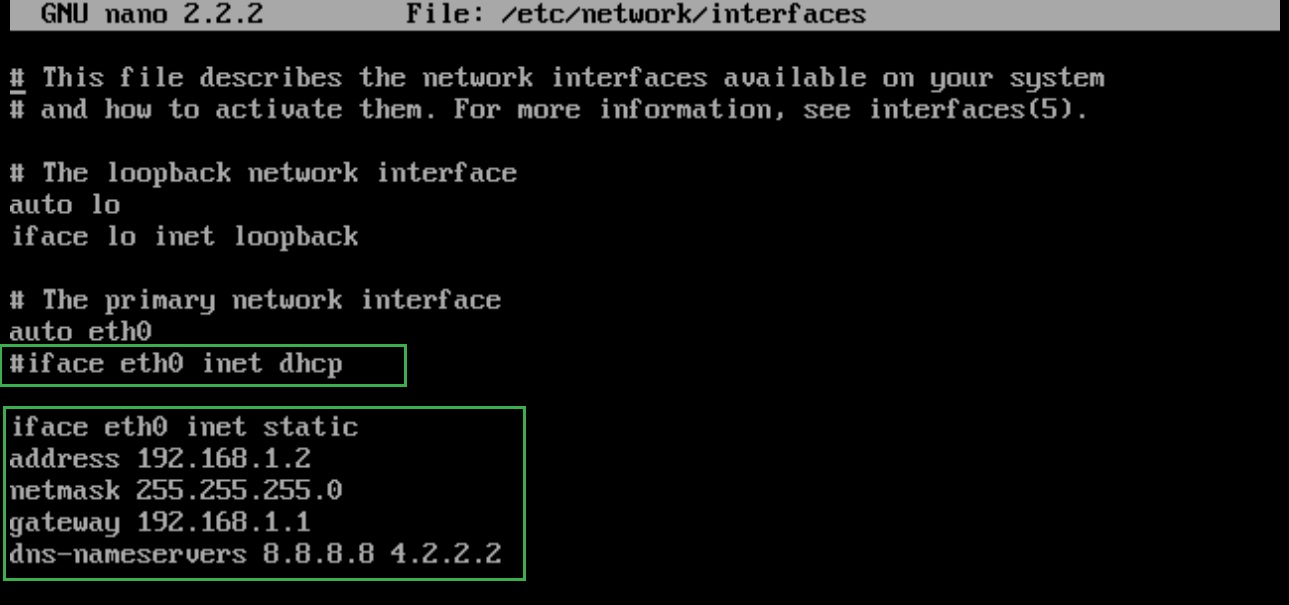
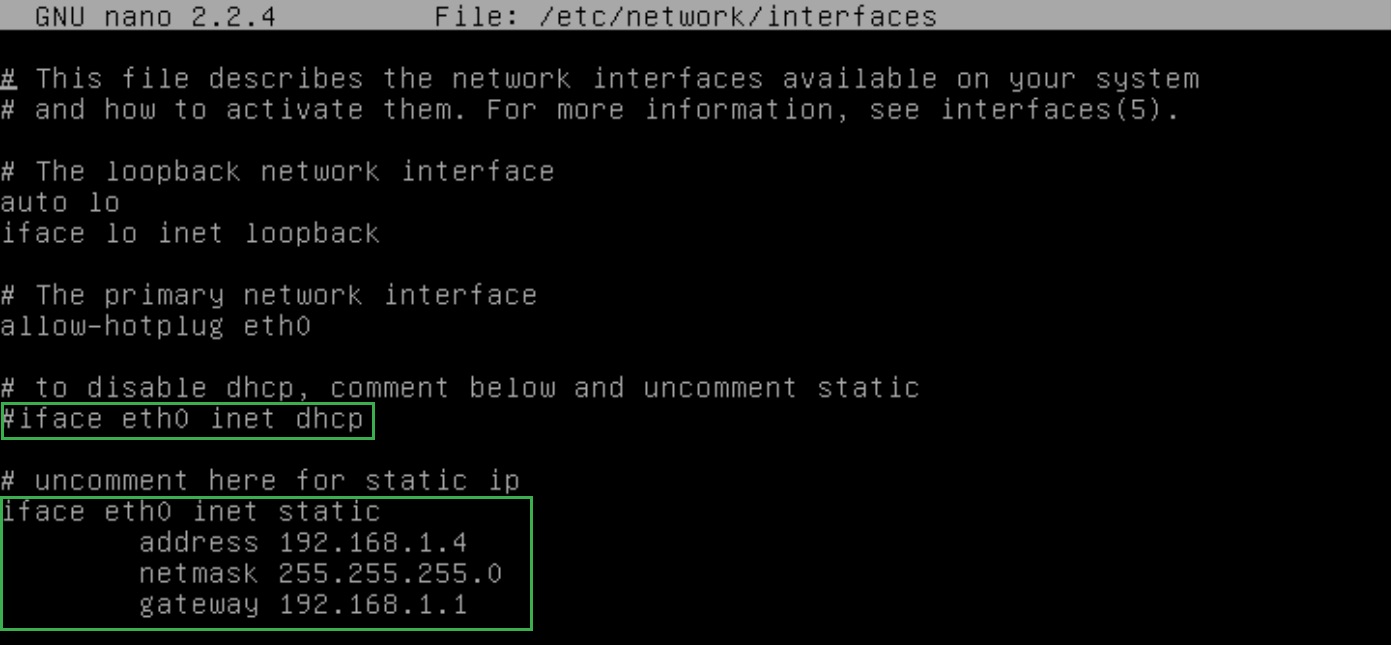
To set a static IP, please check and open the file /etc/network/interfaces using nano editor, comment out dhcp, and set the IP address
nano /etc/network/interfaces
Write or edit the following content in the above file
auto eth0
#iface eth0 inet dhcp
iface eth0 inet static
address 192.168.1.2
netmask 255.255.255.0
gateway 192.168.1.1
Save the file using CTL+X then Y.
You need to restart the networking services to take the IP address setting into effect.
/etc/init.d/networking restart

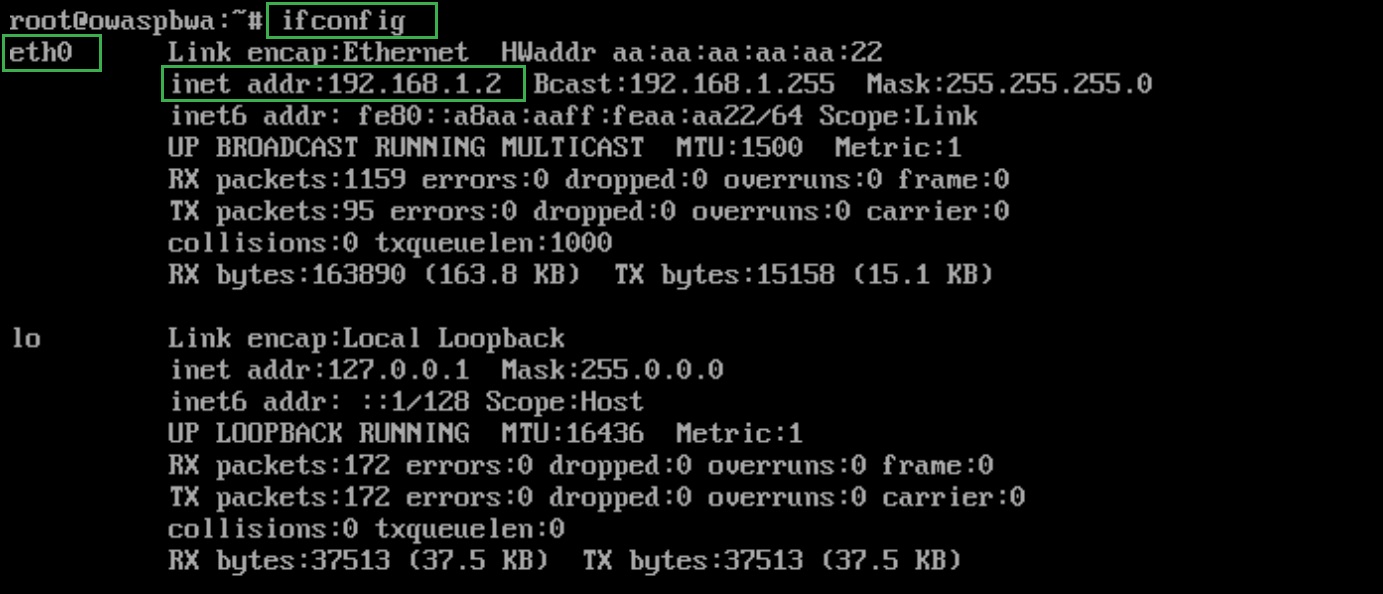
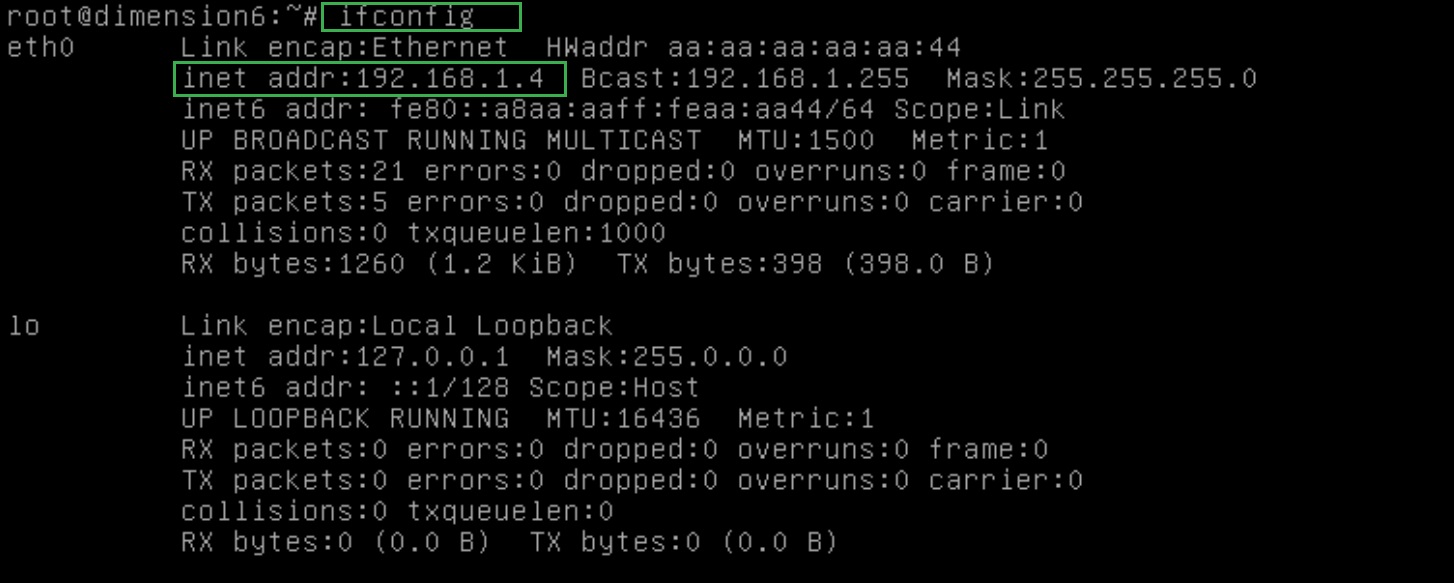
verify the static IP and other details configured on the interface eth0, you can also reach to internet as Edge router is already configured.
ifconfig
ping 8.8.8.8

Note: Use CTL+C to cancel ping replies.
Step 3: BWAPP Server Setup
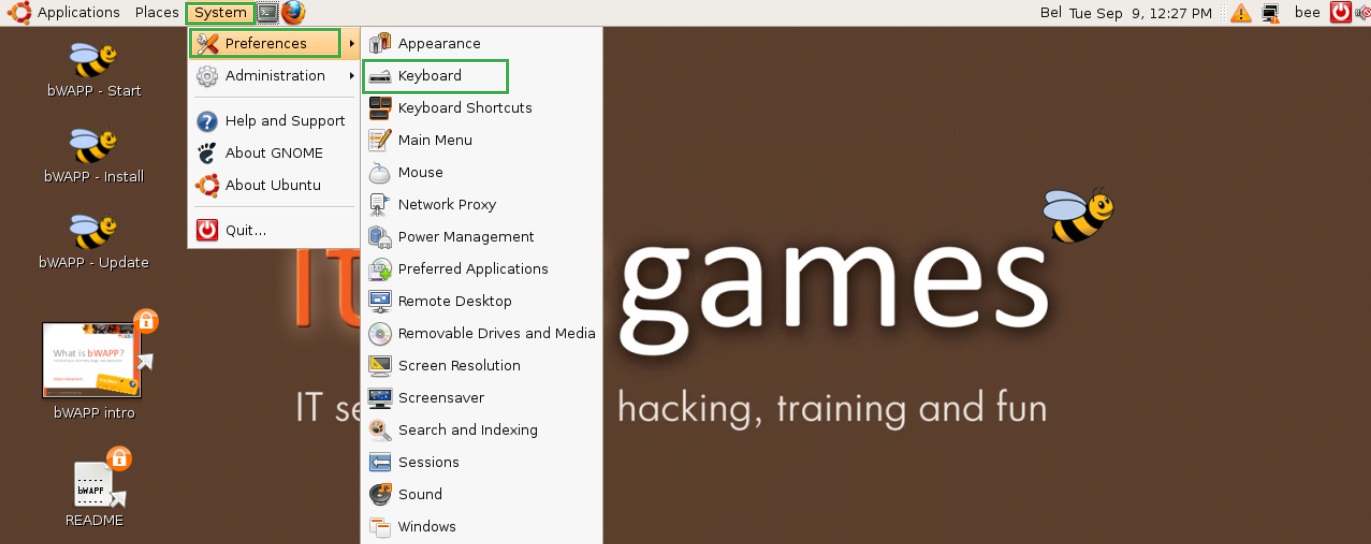
1. Log in to the BWAPP Server GUI; there is no username or password. To assign static IP first add English Keyboard navigate to System > Preferences> Keyboard
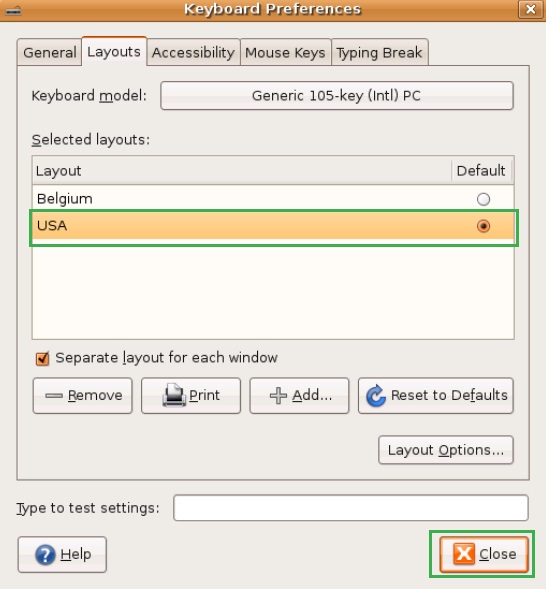
2. Click on Layout then click on Add, here you select the USA for english keyboard, make it default and click on close to continue.
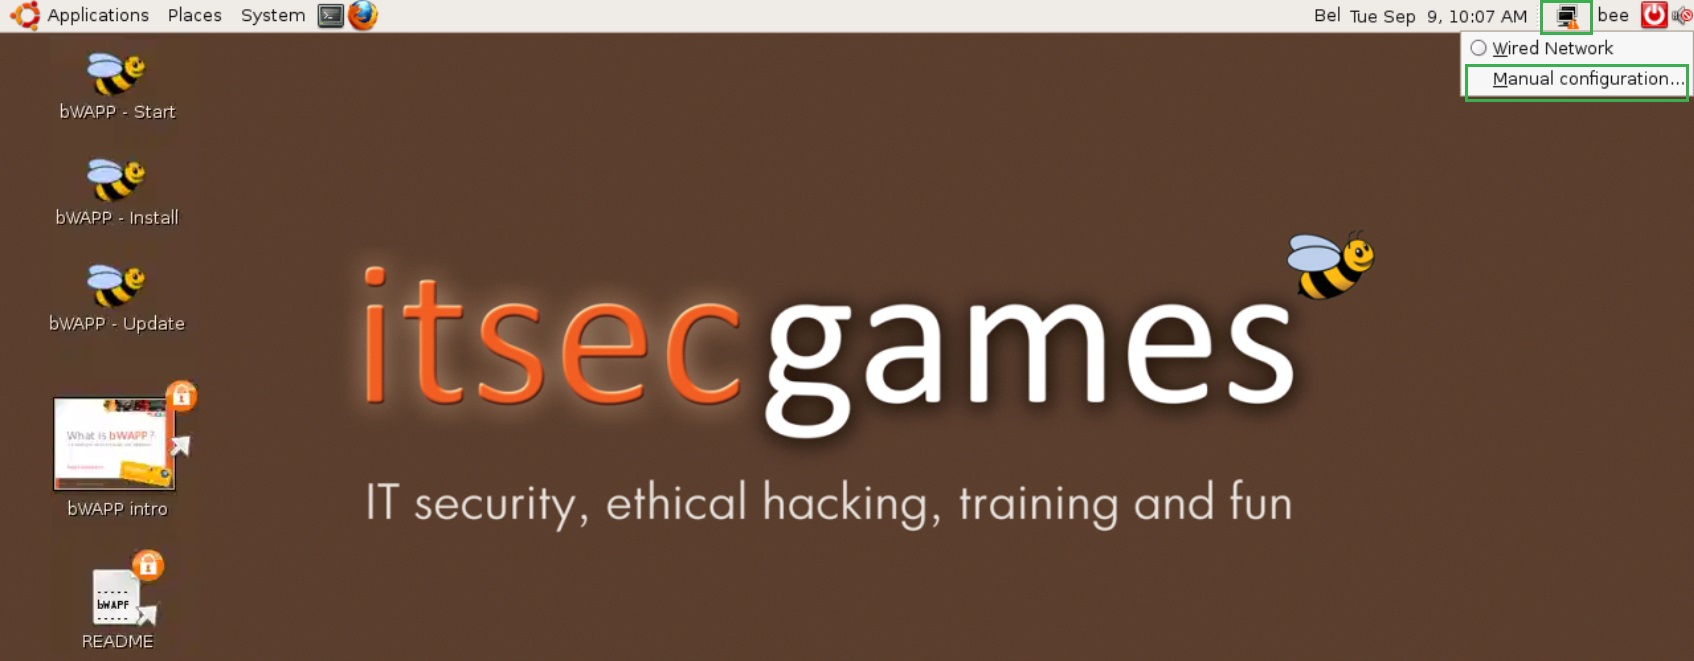
3. Click on top right corner to enable network connection and select Manual configuration.
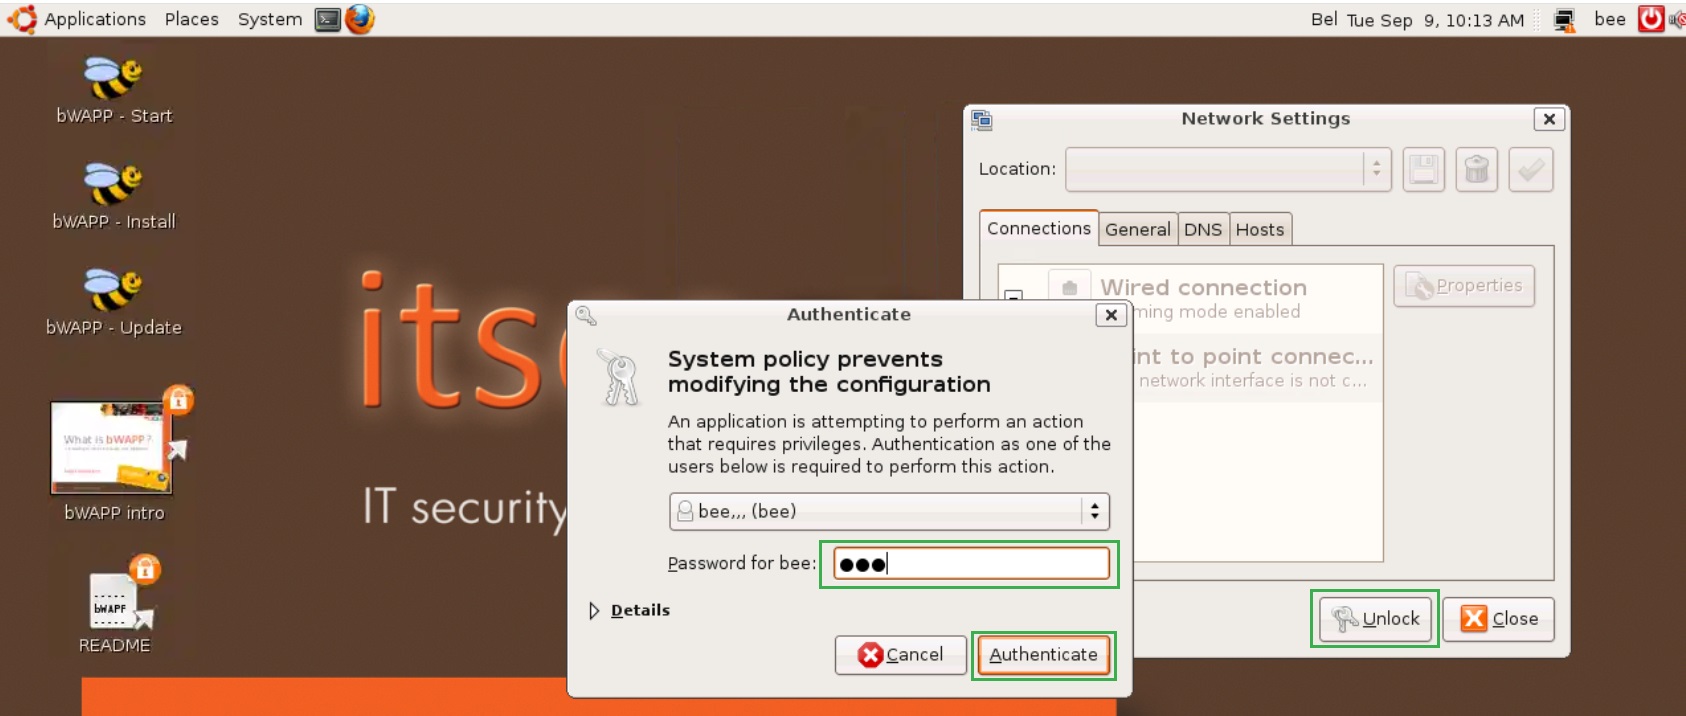
4. Here you have to enter the password "bee" for username "bug" or "root" to unlock the network setting. Click on Authenticate to continue.
5. Now select wired connections and click on properties.
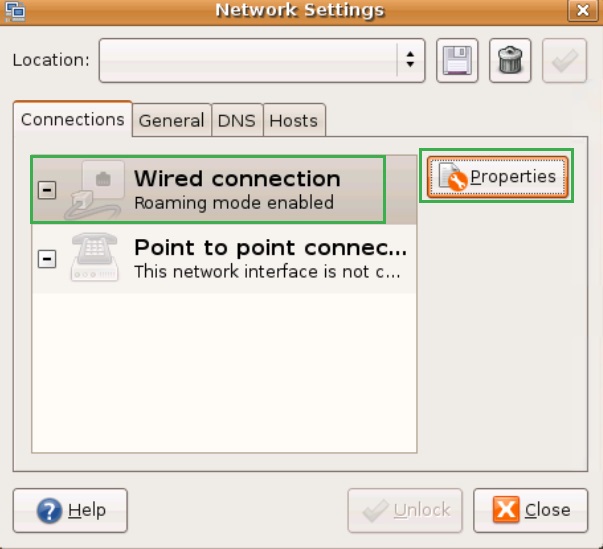
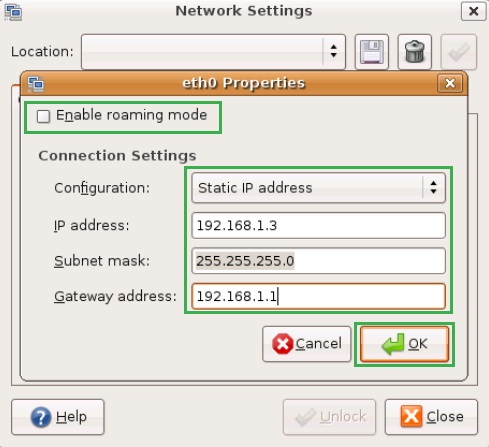
6. Unselect "Enable roaming mode" and enter the IP address and other values as follows.
● Configuration: Static IP address
● IP address: 192.168.1.3
● Subnet mask: 255.255.255.0
● Gateway address: 192.168.1.1
● Click on Ok to continue.
You can verify the configured IP address and connectivity to the internet. Open the terminal and write the below commands.
ifconfig
Ping 8.8.8.8
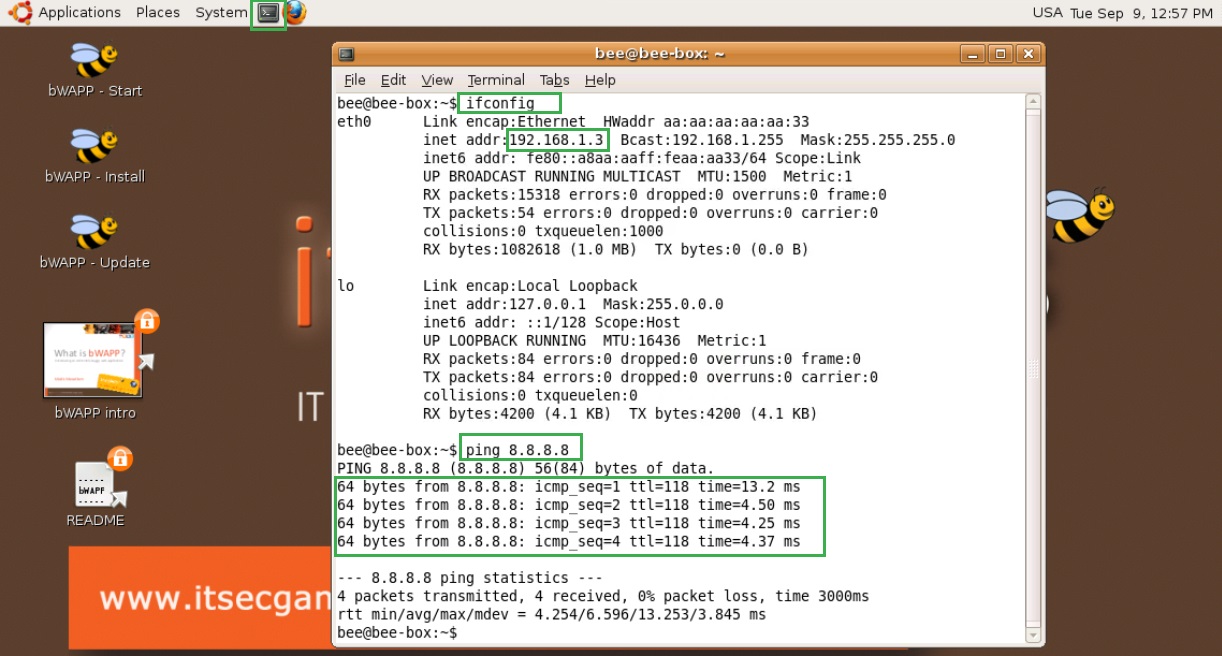
Note: use CTL+c to stop the ping command output.
Step 4: PHPAC Server
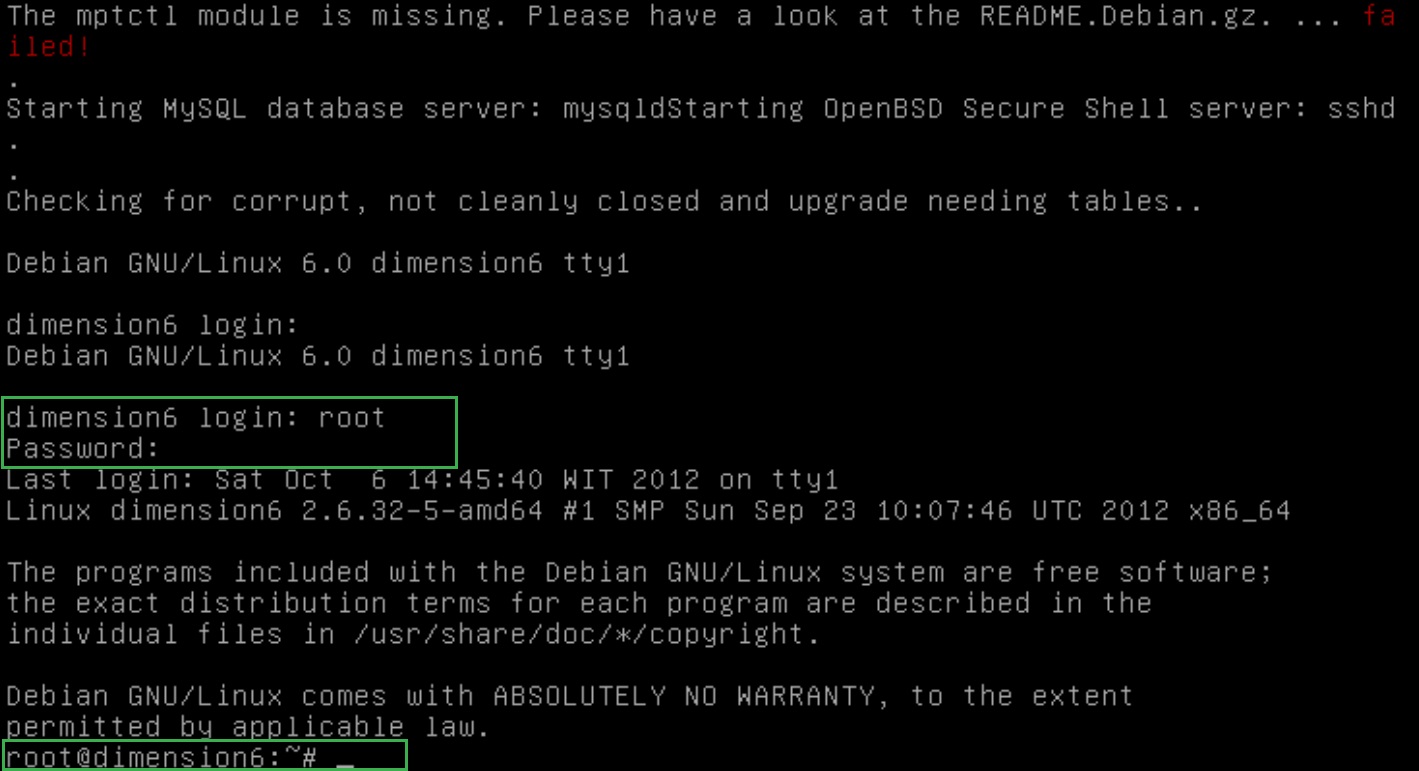
1. Get the CLI console of the PHPAC server and login into it using default username and password as root/defaut
2. To set static IP, please check and open the file /etc/network/interfaces using nano editor, comment dhcp and set IP address
nano /etc/network/interfaces
3. Write or edit the following content in the above file
auto eth0
#iface eth0 inet dhcp
iface eth0 inet static
address 192.168.1.4
netmask 255.255.255.0
gateway 192.168.1.1
Save the file using CTL+X then Y.
4. You need to restart networking service using the command
/etc/init.d/networking restart
OR
reboot
5. Once server is rebooted, login into the server again then verify the IP address on the server
ifconfig
Step 5: Metasploitable Server
1. Get the CLI console of Metasploitable Server and login into it using default username and password as msfadmin/msfadmin
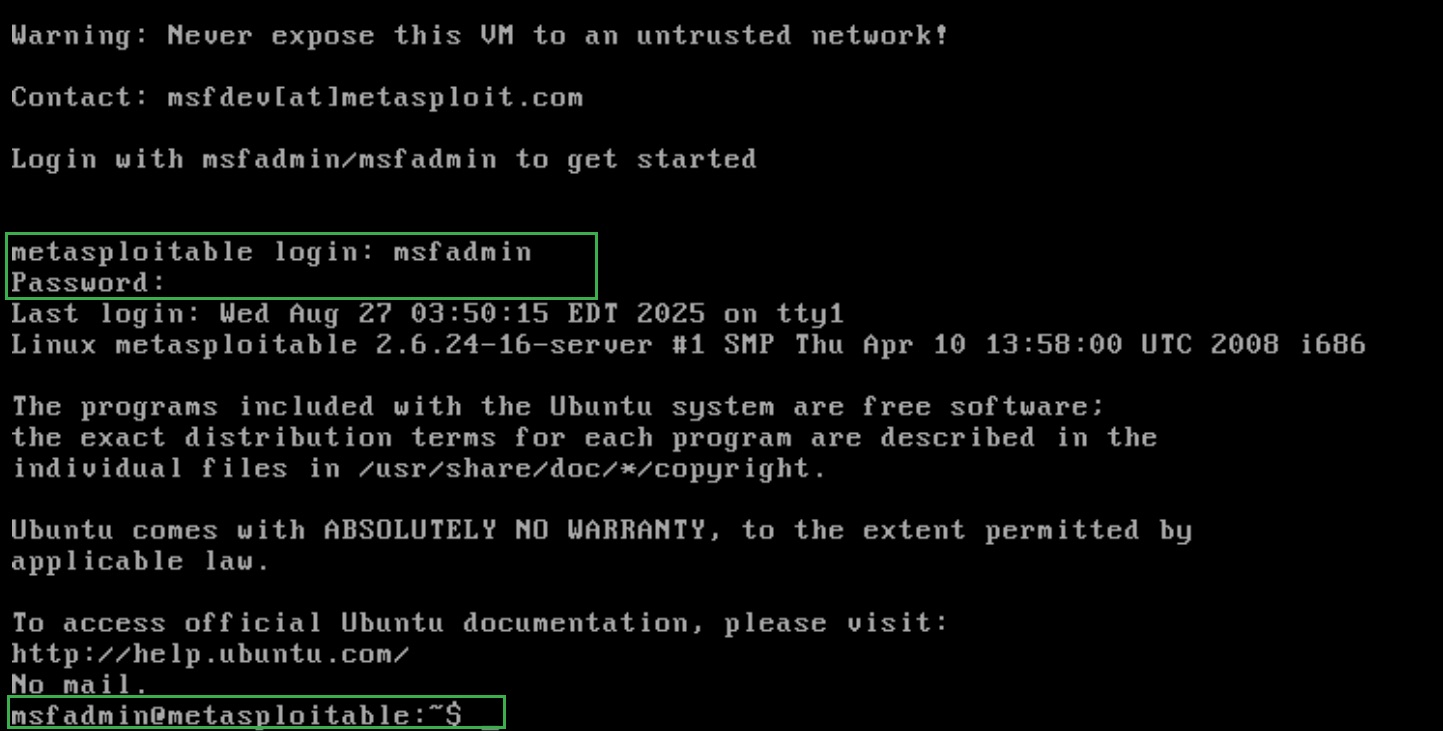
2. You can switch to sudo user using the command, followed by msfadmin password.
sudo su

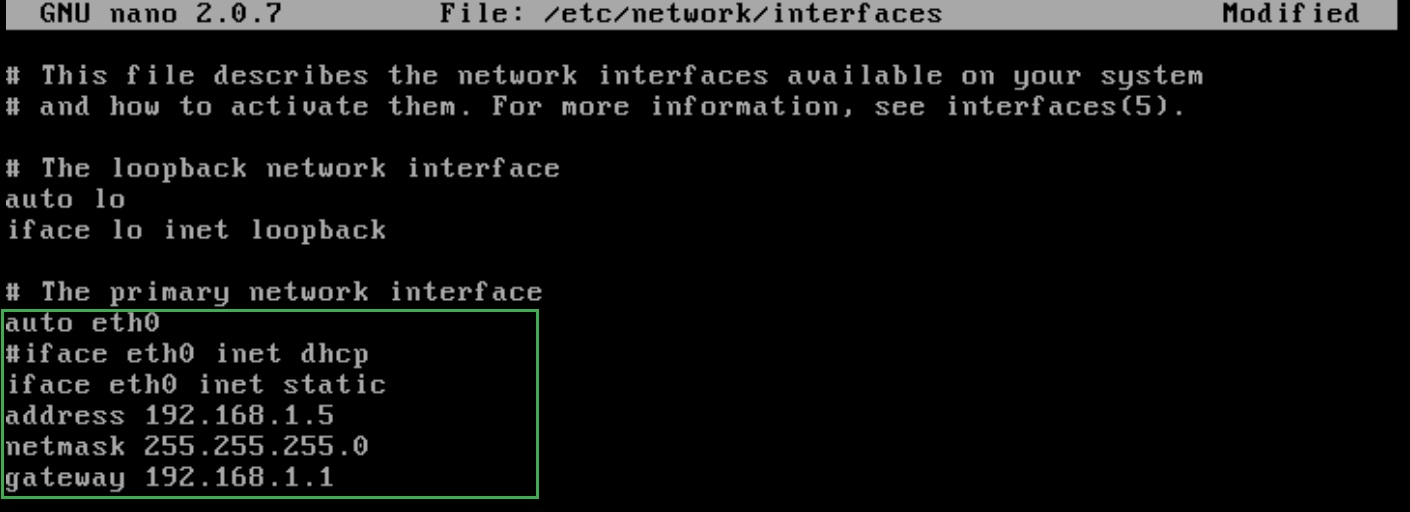
3. To set static IP, please check and open the file /etc/network/interfaces using nano editor, comment dhcp and set IP address
sudo nano /etc/network/interfaces
4. Write or edit the following content in the above file
auto eth0
#iface eth0 inet dhcp
iface eth0 inet static
address 192.168.1.5
netmask 255.255.255.0
gateway 192.168.1.1
Save the file using CTL+X then Y.
5. You need to restart networking service using the command
sudo /etc/init.d/networking restart
OR
reboot
6. Once server is rebooted, login into the server again then verify the IP address on the server
ifconfig eth0
Ping 8.8.8.8
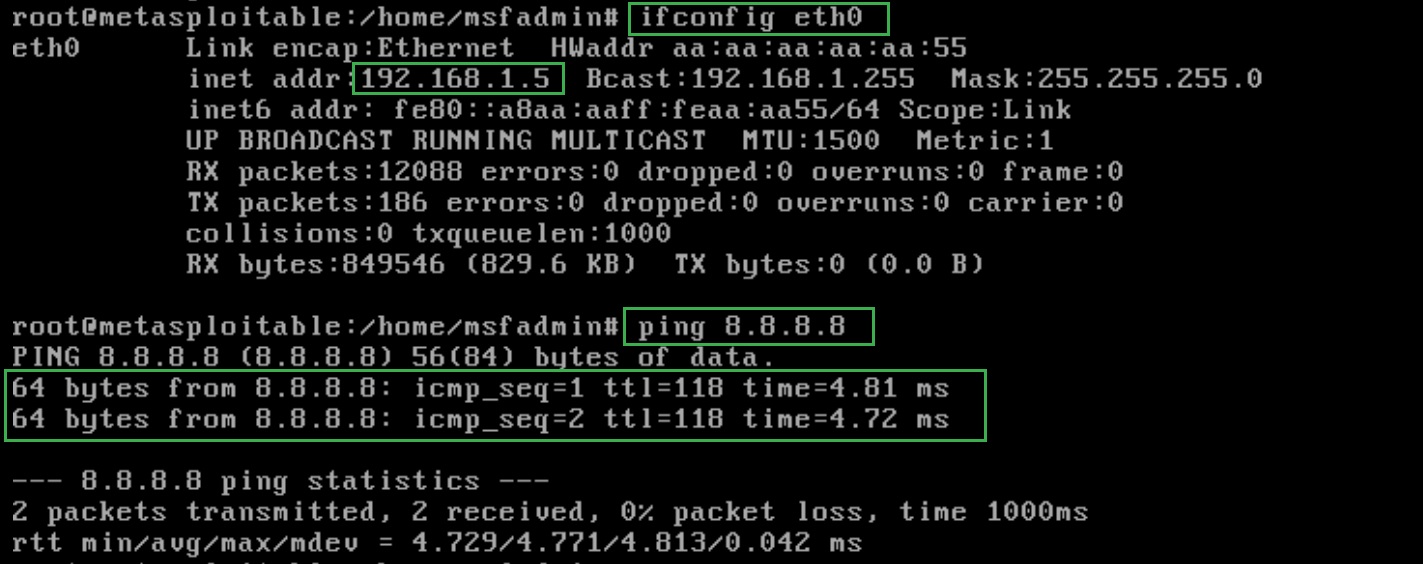
You also need to fix a database issue by editing the config.inc file
cd /var/www/mutillidae
ls
nano config.inc
# replace metasploit with owasp10
$dbname = 'owasp10'
Save the file using CTL+X then Y.
7. Then reload the service using the following command.
sudo /etc/init.d/apache2 reload
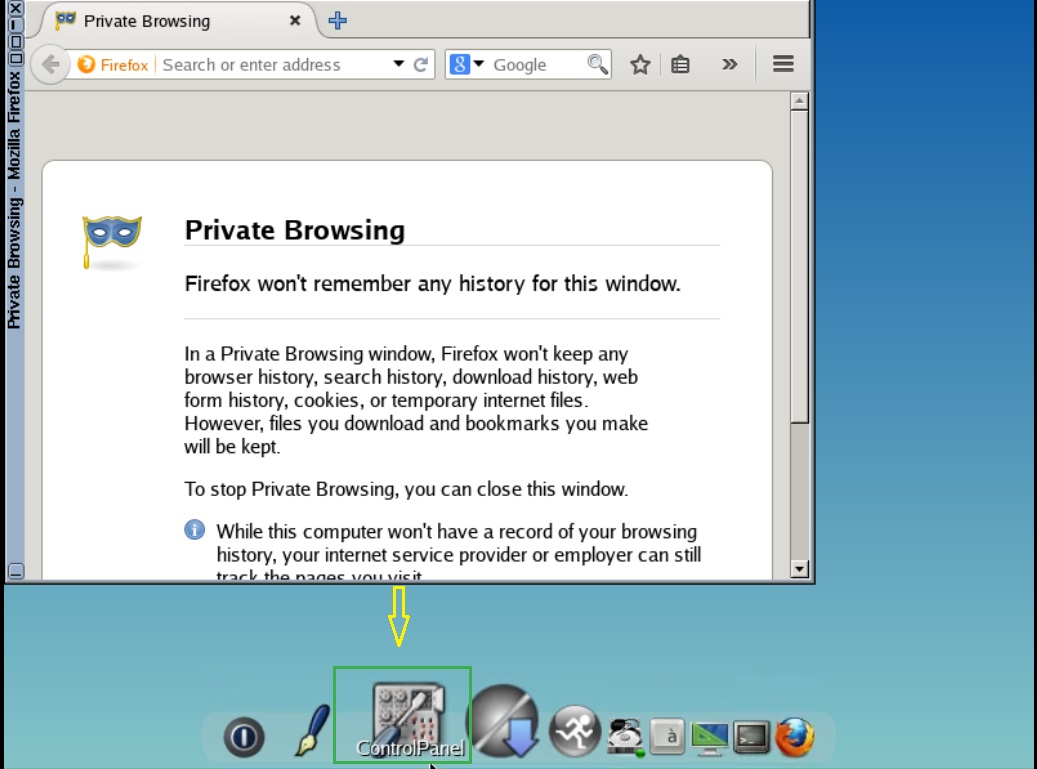
Step 6: Web-SRV1 (Linux-tinycore)
1. Get the GUI access of Web-SRV1. Click on Control Panel
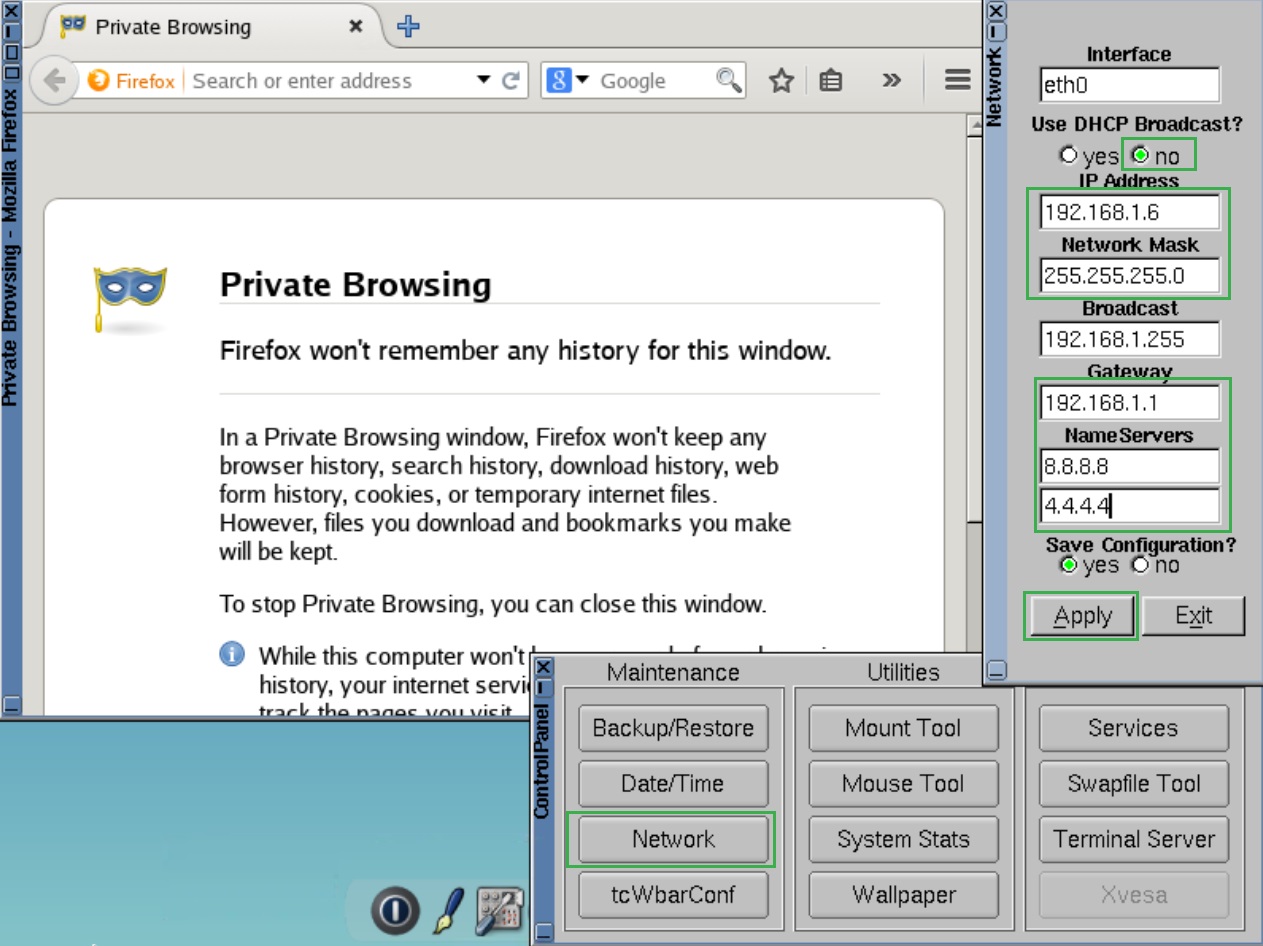
● IP: 192.168.1.6
● Network Mask: 255.255.255.0
● Gateway: 192.168.1.1
● Name Servers: 8.8.8.8 and 4.2.2.2
2. Then click on Network and assign IP Address, Network Mask, Broadcast, Gateway, Name Servers and click Apply
3. Open terminal in CLI type commands
sudo su
filetool.sh -b

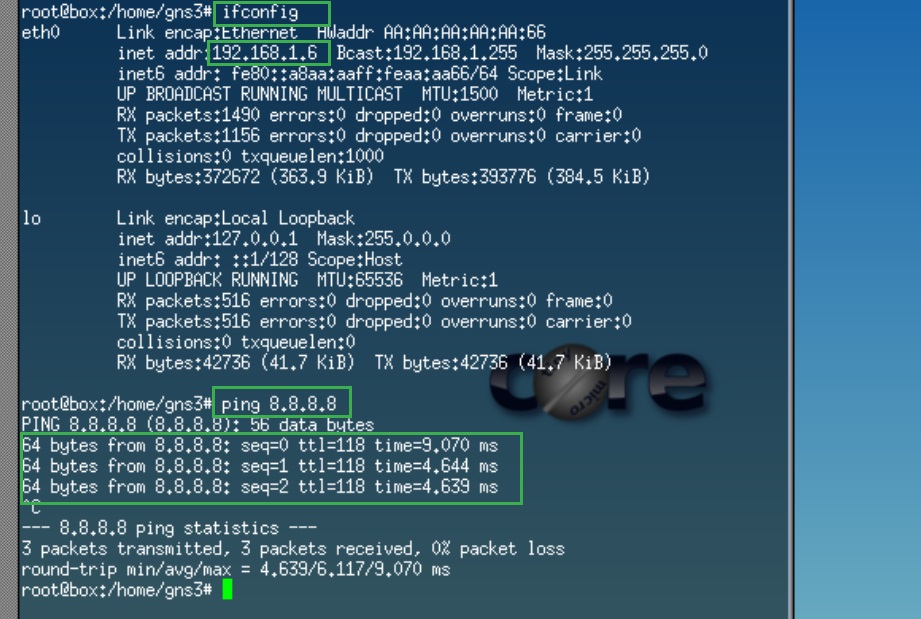
Now, verify the assigned IP address and connectivity to the internet.
ifconfig
ping 8.8.8.8
Note: use CTL+c to stop the ping command output.
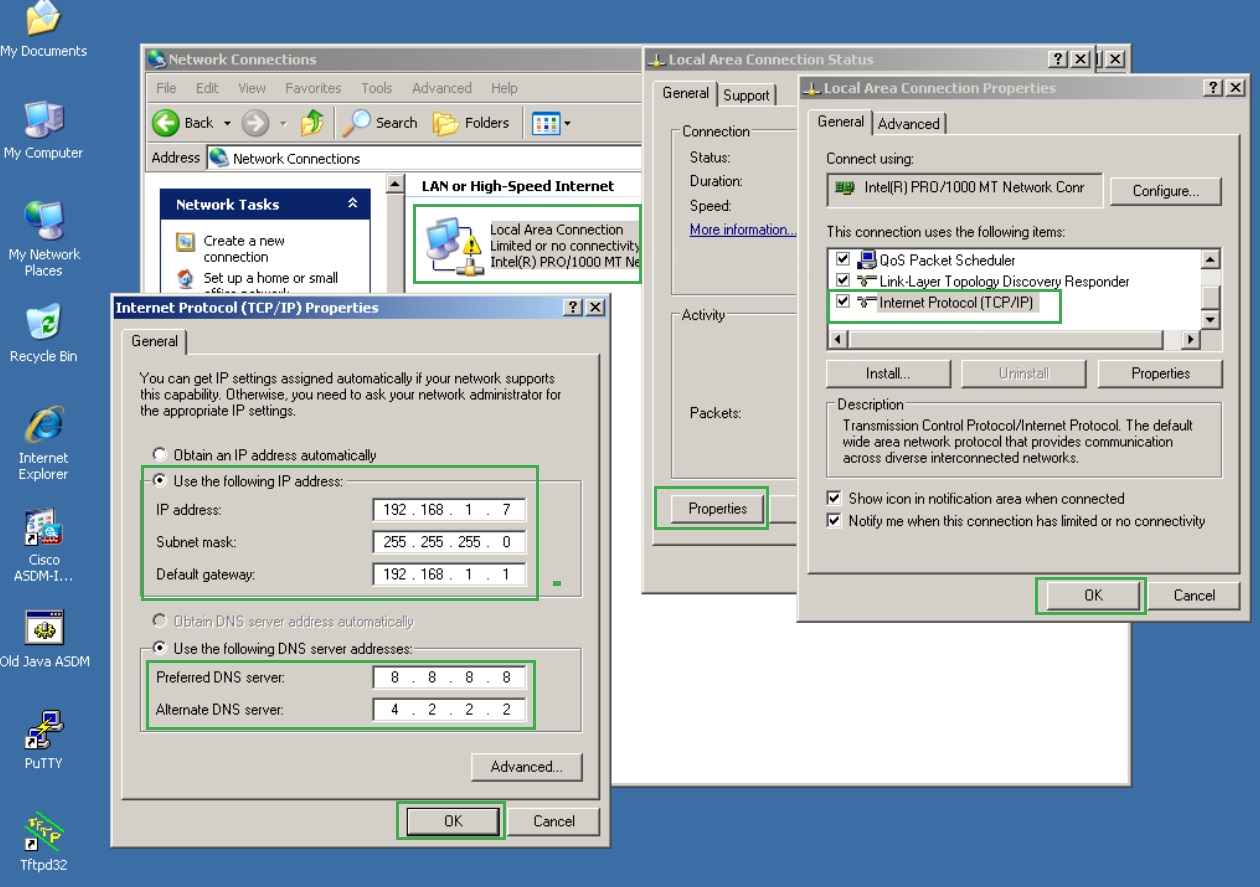
Step 7: Web-SRV2 (Windows XP)
1. Go to Control Panel > Network Connections > Local Area Connection > Properties > Internet Protocol (TCP/IP)
Enter the following:
● IP: 192.168.1.7
● Subnet Mask: 255.255.255.0
● Default Gateway: 192.168.1.1
● DNS: 8.8.8.8 and 4.2.2.2
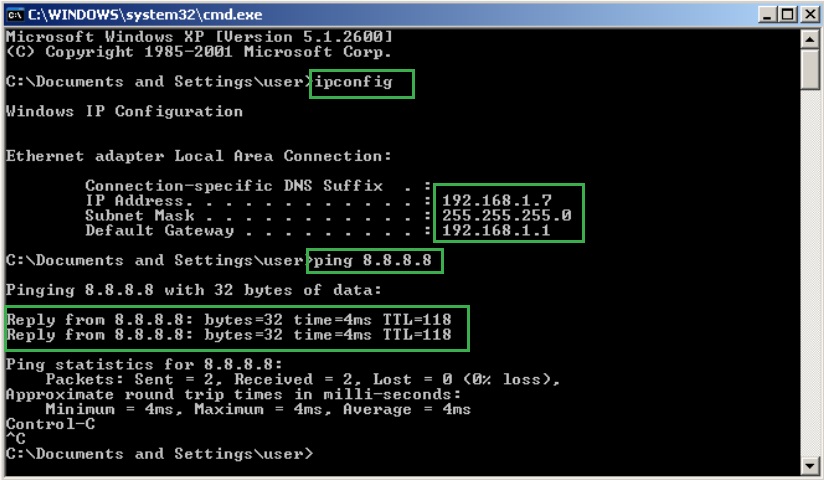
2. Verify the above IP setting and connectivity to the internet using commands on the command prompt. Open the command prompt and type the follwing commands.
ipconfig
ping 8.8.8.8
3. Navigate to Start > Programs > XAMPP > XAMPP Control Panel start the web services (Apache)
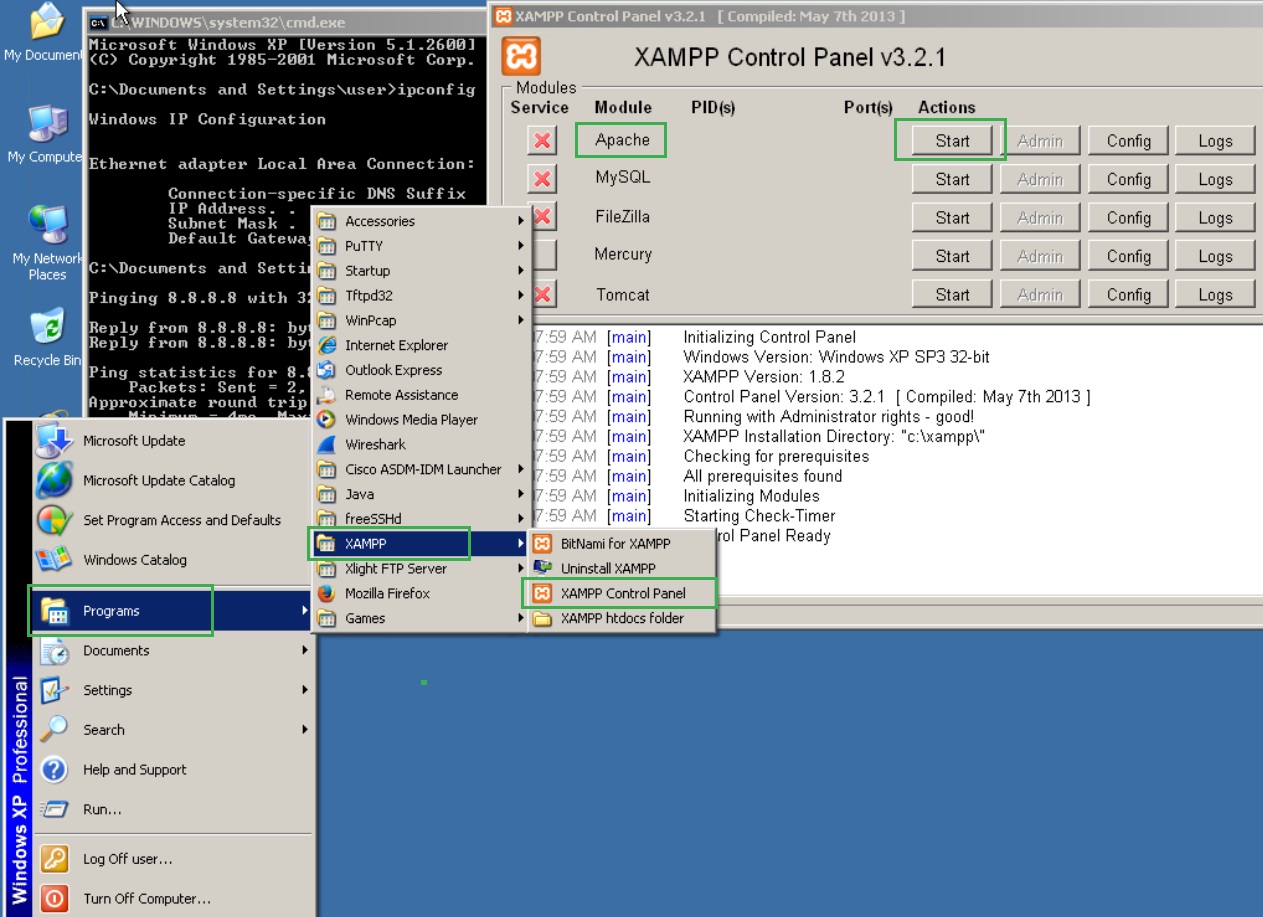
Note: Please note, you need to start web service everytime you start this server else webserver will not start.
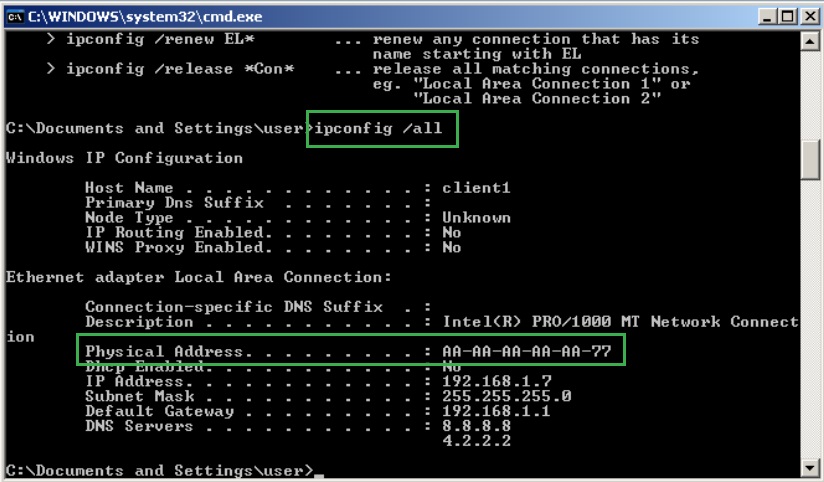
4. Change the MAC address of the ethernet to AAAAAAAAAA77 , right click on My Computer and select Manage. In Manage select "Device Manager" and right click on ethernet adoptor name.
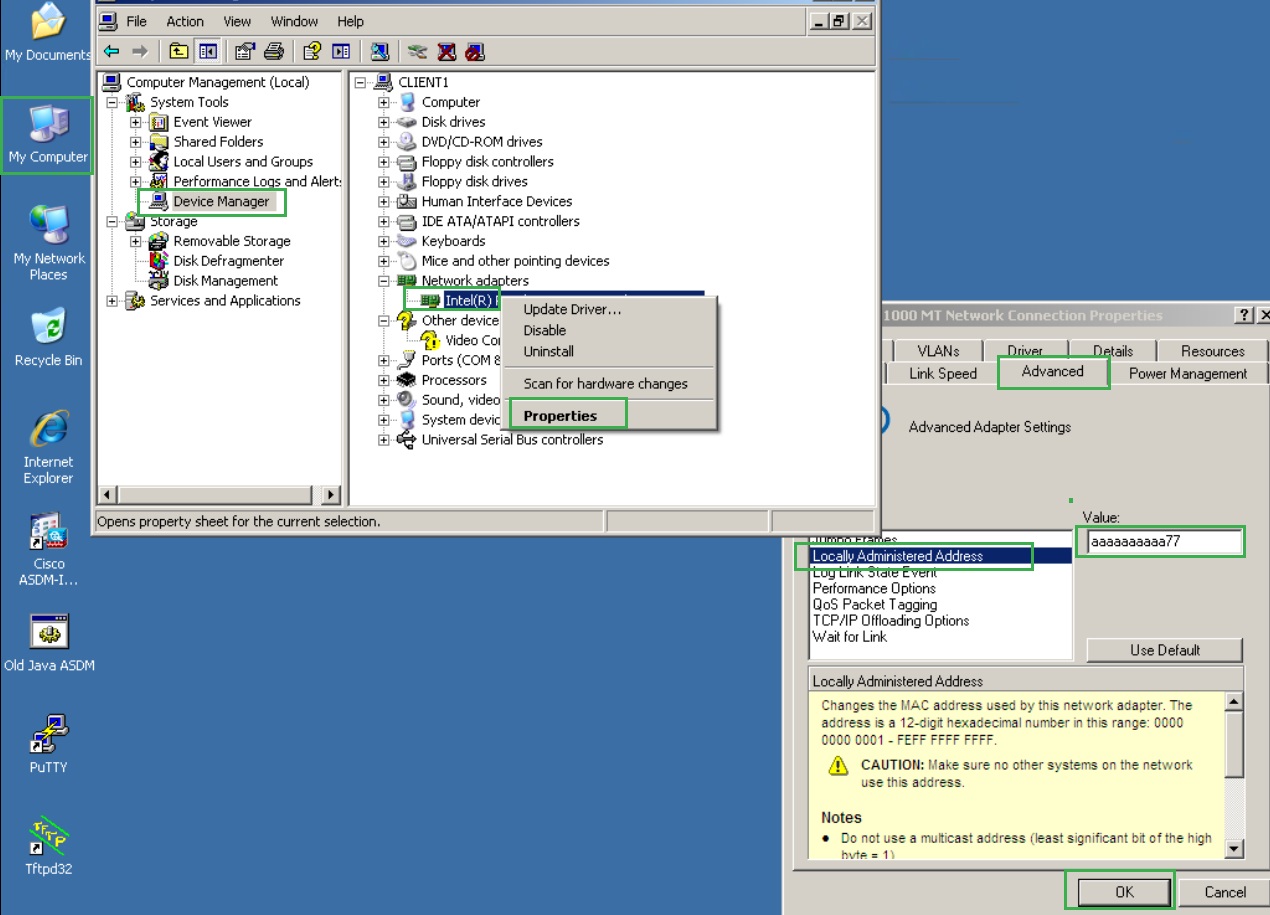
5. Verify the modified MAC address using command
ipconfig /all
Step 8: Kali Linux Attacker Machine
1. Get the GUI console access of the Kali-Attacker machine. Log in to it using username and password as kali/kali
--------------------
Note:
In case your Kali-Attacker machine opens with prompt (initramfs), then you need to run the following commands
blkid
fsck /dev/vda1 -y
reboot -y

--------------------
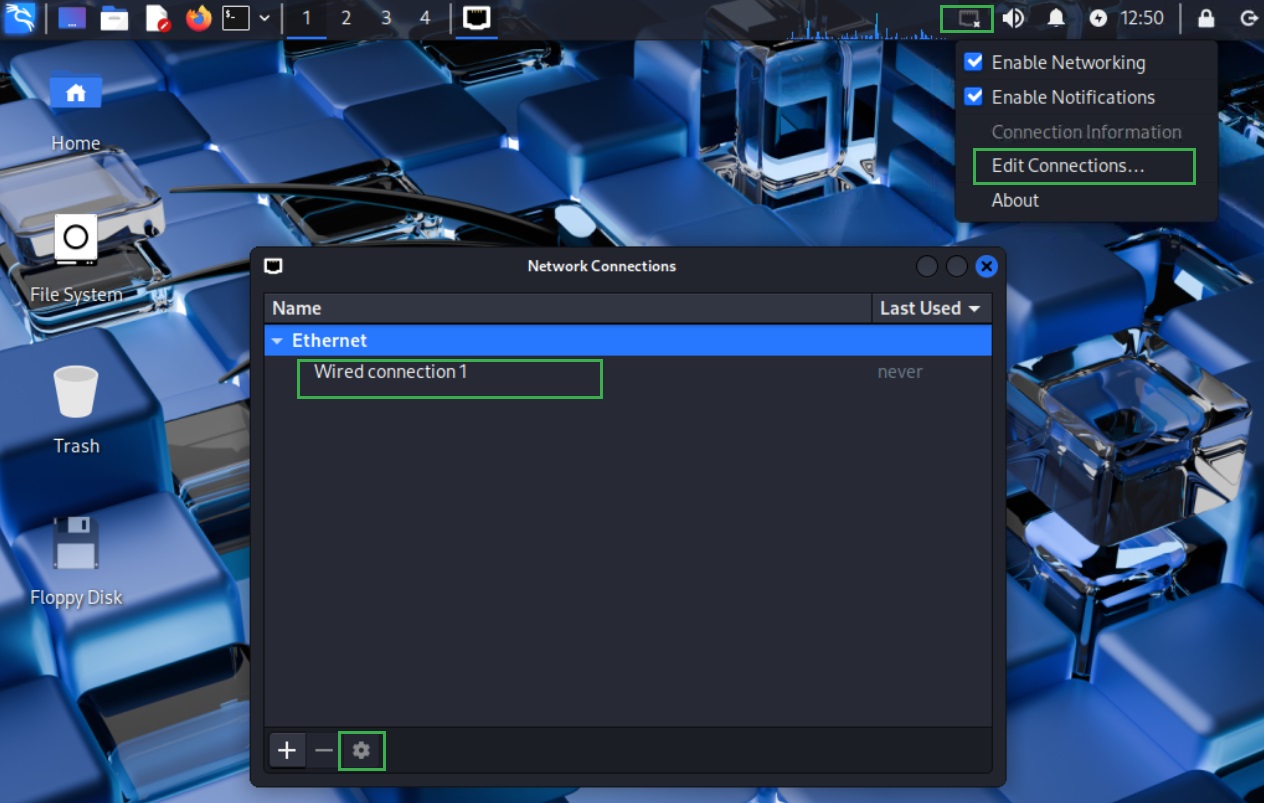
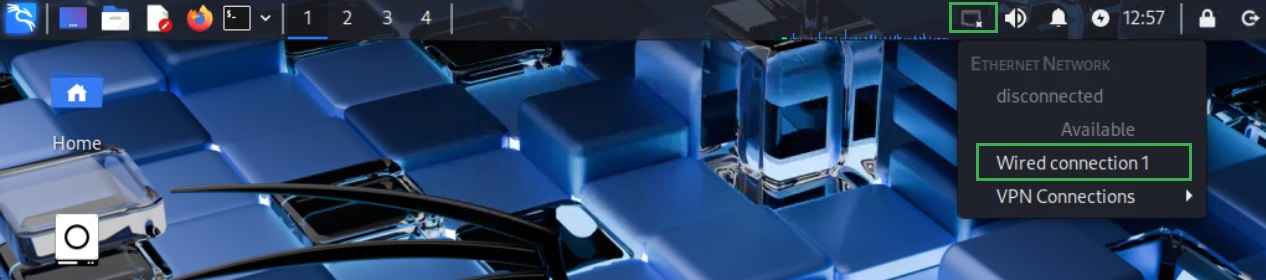
2. Next to the clock, right-click on the network connections icon. In the context menu that opens, click on “Edit Connections…”. Select the network for which you want to configure a static IP
address and click the gear icon.
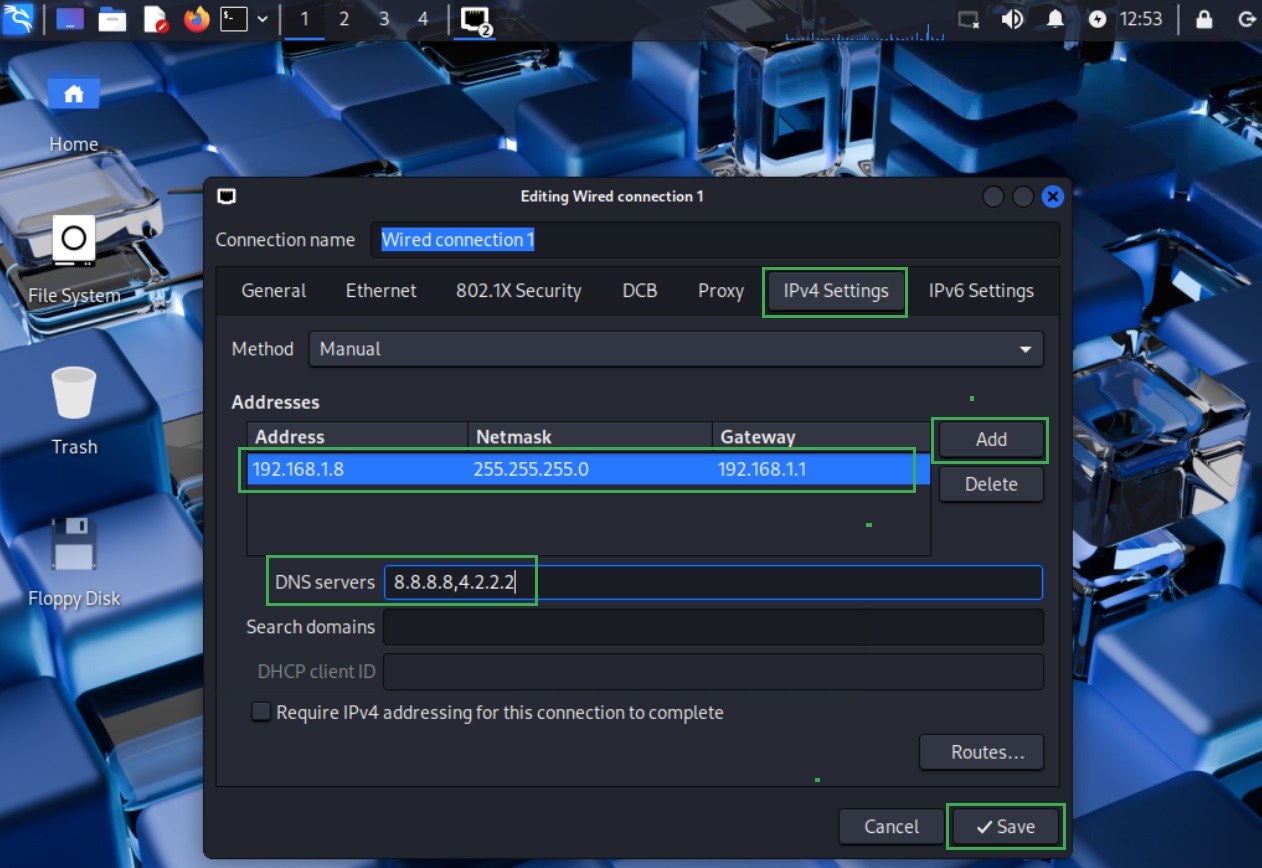
3. In the window that opens, go to the “IPv4 Settings” tab. Select “Manual” for the “Method”. Then click the Add button and enter the values you want. Click the “Save” button.
4. Changes will take effect after reconnecting to the network. Click on Disconnect.
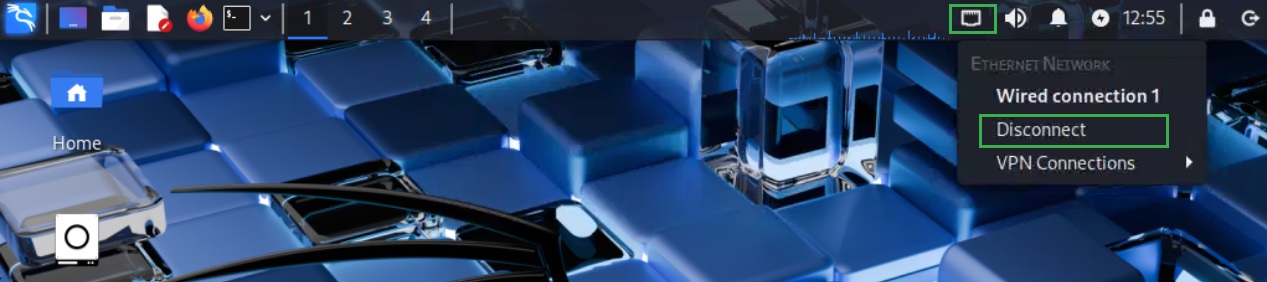
and then click on Wired connection 1
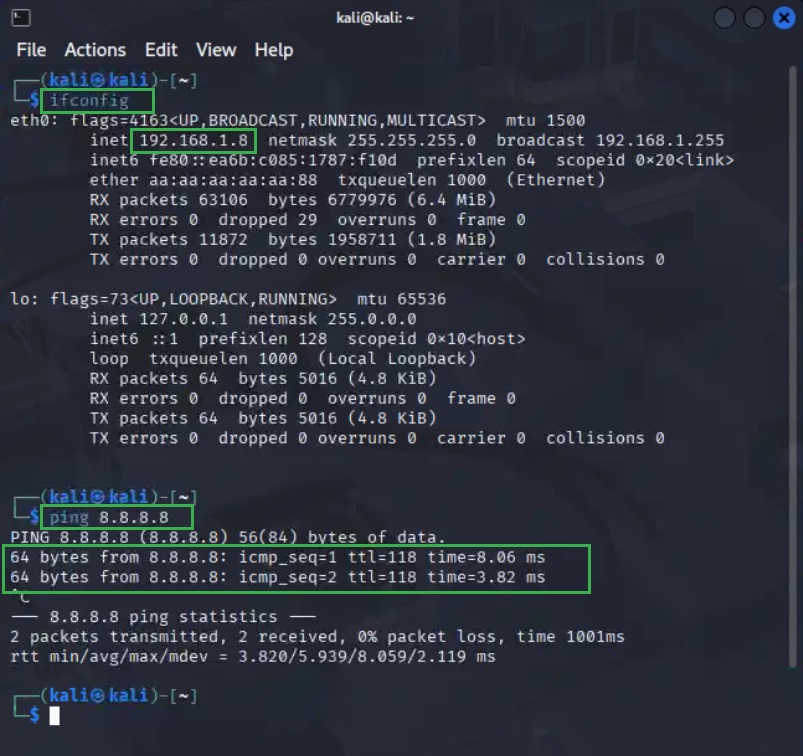
5. Let’s verify the IP Address details and connectivity to the internet using the CLI commands on the terminal.
ifconfig
ping 8.8.8.8
Use CTL+c to stop ping responses.
Step 9: PC3 and Remote-PC1 (Linux Slux - DHCP Clients)
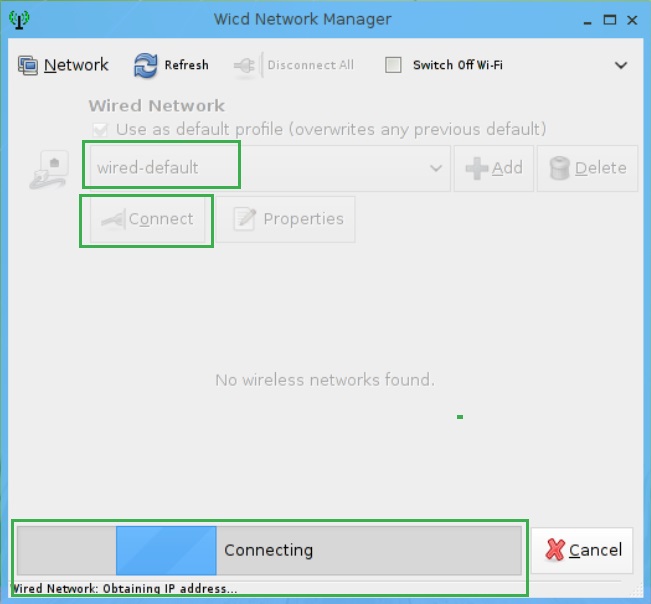
1. Both Linux Slug are the DHCP client obtaining IP address information from Edge router which is a DHCP server. Access these machine and go to bottom left menu then click on Net Manager.

2. In the network manager, click on Connect, which will connect to the wired network and obtain the IP address via DHCP.
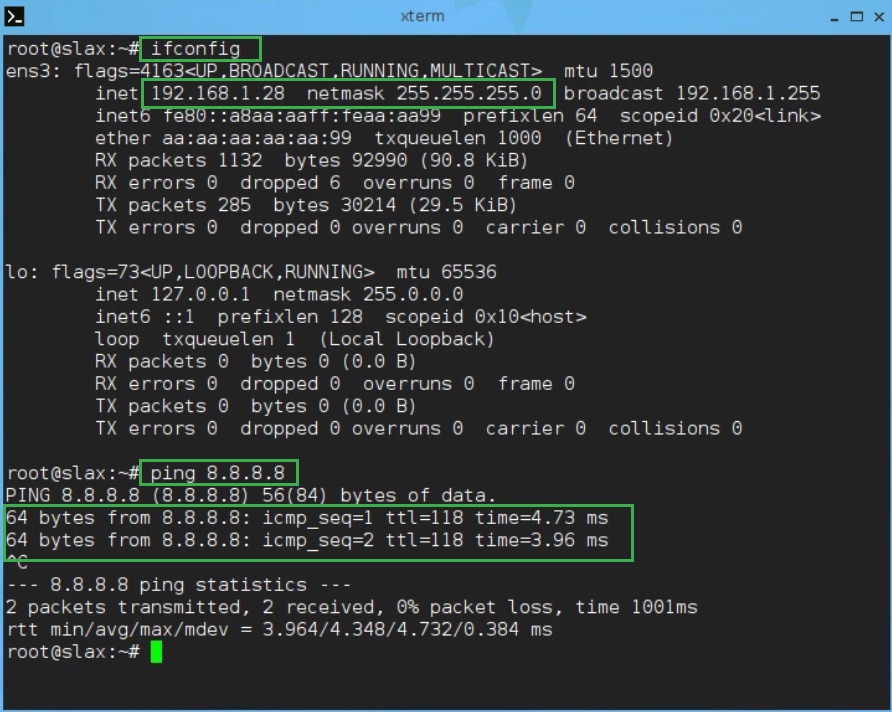
3. Let’s verify the IP Address details and connectivity to the internet using the CLI commands on the terminal.
ifconfig
ping 8.8.8.8
Use CTL+c to stop ping responses.
Step 10: PC1 and PC2
These machines are preconfigured to receive an IP address via DHCP. In case they are not then please run these commands on them.
PC1
set pcname PC1
ip dhcp
save
PC2
set pcname PC2
ip dhcp
save
