Objective:
This is the very first lab in your Palo Alto firewall learning path. The goal is to help beginners:
● Set up physical connections according to a defined topology.
● Assign IP addresses to all participating devices (PC, Server, Workstation, and Palo Alto interfaces).
● Log in to the Palo Alto firewall via console (Left click on it).
● Configure IP addresses and zones on the firewall interfaces.
● Verify connectivity between devices at Layer 3 using ping.
This lab is essential because all other labs will build upon this configuration.
Topology Overview:
Palo Alto Firewall Interfaces are connected as follows
eth1/1: Connects to Internet Router – “Untrust” zone
eth1/2: Connects to PC – “Inside” zone
eth1/3: Directly connected to Server (DMZ host) – “DMZ” zone
Mgmt: Directly connected Windows workstation - "Management"
IP Addressing Scheme:
| Device | Interface | IP Address | Subnet Mask | Zone | Description |
|---|---|---|---|---|---|
| Internet GW | G0/0 | 192.168.100.254 | 255.255.255.0 | — | Simulated Internet router |
| Palo Alto FW | ethernet1/1 | 192.168.100.1 | 255.255.255.0 | Untrust | Faces Internet |
| Palo Alto FW | ethernet1/2 | 192.168.1.1 | 255.255.255.0 | Inside | LAN side |
| Palo Alto FW | ethernet1/3 | 192.168.2.1 | 255.255.255.0 | DMZ | DMZ-facing interface |
| PC | NIC (eth0) | 192.168.1.10 | 255.255.255.0 | — | Inside the user device |
| Server | NIC (eth0) | 192.168.2.10 | 255.255.255.0 | — | DMZ server |
Make sure your Palo Alto firewall and other devices are powered on and are ready for configuration.
Note: Internet-Router is preconfigured, Interface Gi0/1 is receiving an IP via DHCP from Internet and NAT is enabled for traffic going from Gi0/0 (Inside) to Internet via Gi0/1 (Outside).
On Internet-Router
!
enable
configure terminal
hostname Internet-Router
enable secret xxxxxx
!
!
interface Gi0/0
description connected to palo alto eth1/1
ip address 192.168.100.254 255.255.255.0
ip nat inside
no shutdown
!
!
interface Gi0/1
description connected to internet
ip address dhcp
ip nat outside
no shutdown
!
!
access-list 1 permit 192.168.0.0 0.0.255.255
!
ip nat inside source list 1 interface gigabitEthernet 0/1 overload
!
end
!
write memory
!
Step 1: Configure IP Addresses on PC, Workstations, and Server
1. On PC (Inside Zone)
Go to Control Panel > Network & Internet > Network Connections.
Right-click on your Ethernet adapter → Properties → IPv4.
Enter the following:
● IP: 192.168.1.10
● Subnet Mask: 255.255.255.0
● Default Gateway: 192.168.1.1 (which is the Palo Alto firewall’s eth1/2 IP)
2. On Workstation (Management)
Go to Control Panel > Network & Internet > Network Connections.
Right-click on your Ethernet adapter → Properties → IPv4.
Enter the following:
● IP: 192.168.10.10
● Subnet Mask: 255.255.255.0
3. Server (DMZ Zone)
Log in to the server using the username "uninets" and the password "uninets@123". Edit file /etc/network/interfaces for changing the IP address.
sudo nano /etc/network/interface
Write the following content in the above file
auto ens3
iface ens3 inet static
address 192.168.2.10
netmask 255.255.255.0
gateway 192.168.2.1
Save the file using CTRL+X, then Y. You need to restart the networking service using the command
sudo systemctl restart networking.service
OR
reboot
Once the server is rebooted, log in to the server again, then verify the IP address on the server
ifconfig
PLEASE KEEP SAVING YOUR CONFIGURATION AFTER EACH STEP BY CLICKING ON "COMMIT" FROM THE TOP RIGHT CORNER OF PALO ALTO.
Step 2: Access Palo Alto via Console and Set Management IP
Initially, Palo Alto’s web interface is unreachable. You must configure a management IP via CLI using a console.
1. Connect to the Palo Alto firewall’s management port using a console cable and a tool like PuTTY.
2. Login using default credentials:
Username: admin
Password: admin
3. Enter configuration mode:
configure
4. Set management IP (to access GUI):
set deviceconfig system type static
set deviceconfig system ip-address 192.168.10.1 netmask 255.255.255.0 default-gateway 192.168.10.10
commit
Verify that the management IP address is assigned correctly.
show deviceconfig system
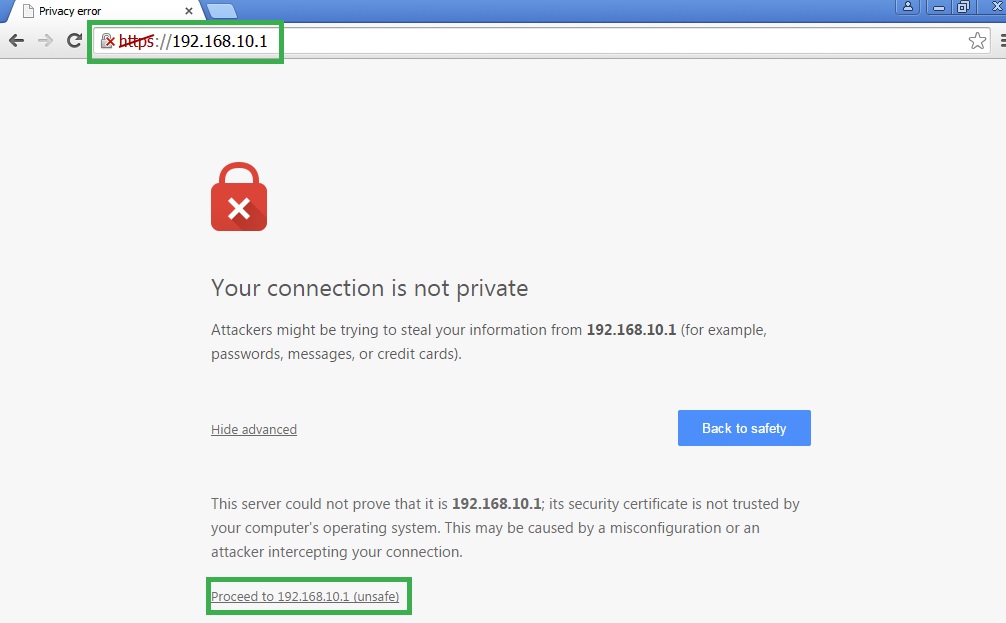
5. Open a workstation that is directly connected to the Palo Alto management (Mgmt Port) and open a browser → Access https://192.168.10.1 → Accept the security warning.
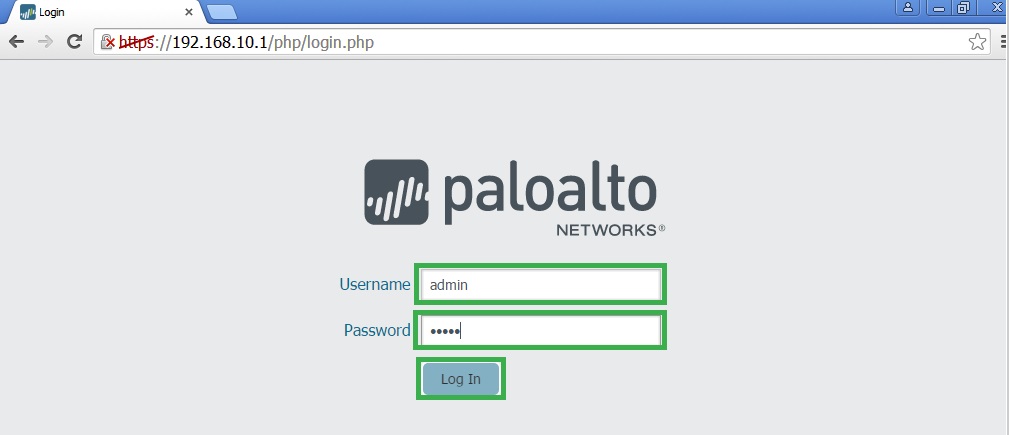
6. Log in with default credentials and change the password when prompted.
Note: Once logged in, please close the message from the content "Panorama CA Certificate Expiring"
Step 4: Configure Network Interfaces in the GUI
Now you will assign IP addresses and security zones to each Palo Alto firewall interface.
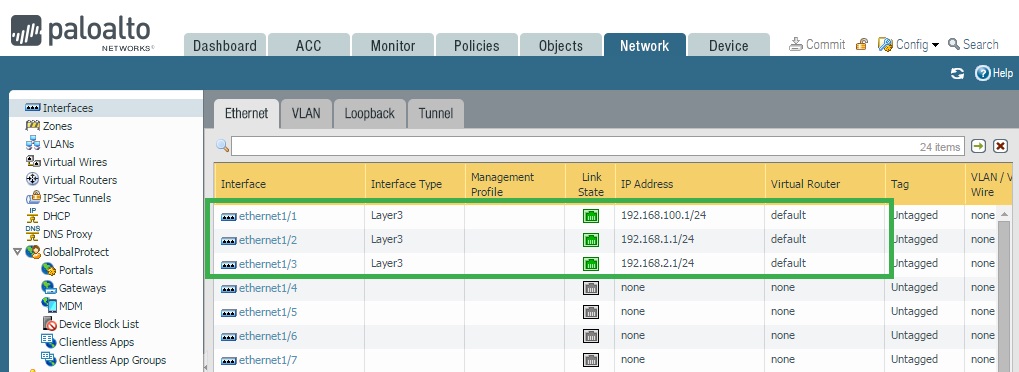
Go to: Network > Interfaces > Ethernet
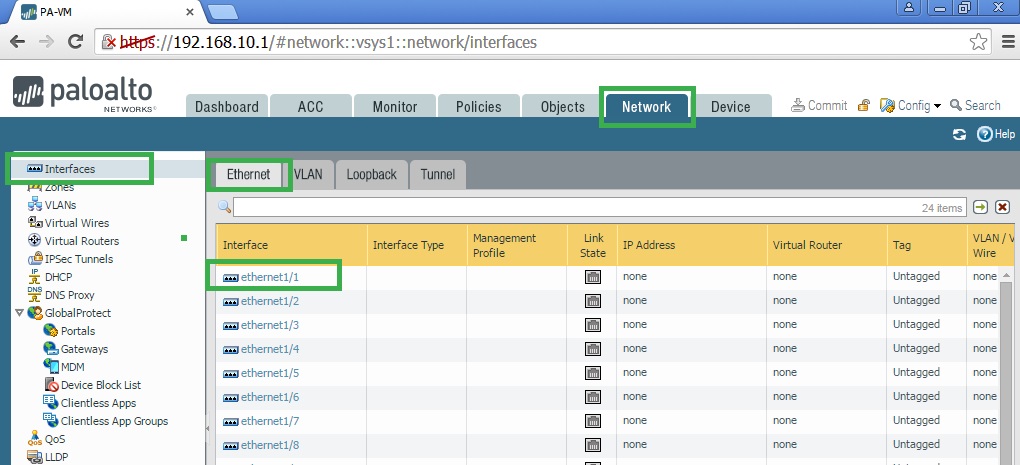
Configure ethernet1/1 (Untrust Interface):
1. Click on ethernet1/1
● Interface Type: Layer3
● Assign to: Virtual Router → default
● Security Zone: Untrust → Click “New Zone” → Name it “Untrust”
● IPv4: Static → Click on Add → Enter IP Address: 192.168.100.1/24
Configure ethernet1/2 (Inside Interface):
1. Click on ethernet1/2
● Interface Type: Layer3
● Virtual Router: default
● Security Zone: New zone → Inside
● IPv4: Static → 192.168.1.1/24
Configure ethernet1/3 (DMZ Interface):
1. Click on ethernet1/3
● Interface Type: Layer3
● Virtual Router: default
● Security Zone: New zone → DMZ
● IPv4: Static → 192.168.2.1/24
Once all interfaces are configured, click Commit (top-right corner) to apply changes.
Step 5: Verify Interface Status and Ping PC and Server from Palo Alto Firewall
1. Go to Dashboard > Network > Interfaces
Check that ethernet1/1, 1/2, and 1/3 all show green UP status.
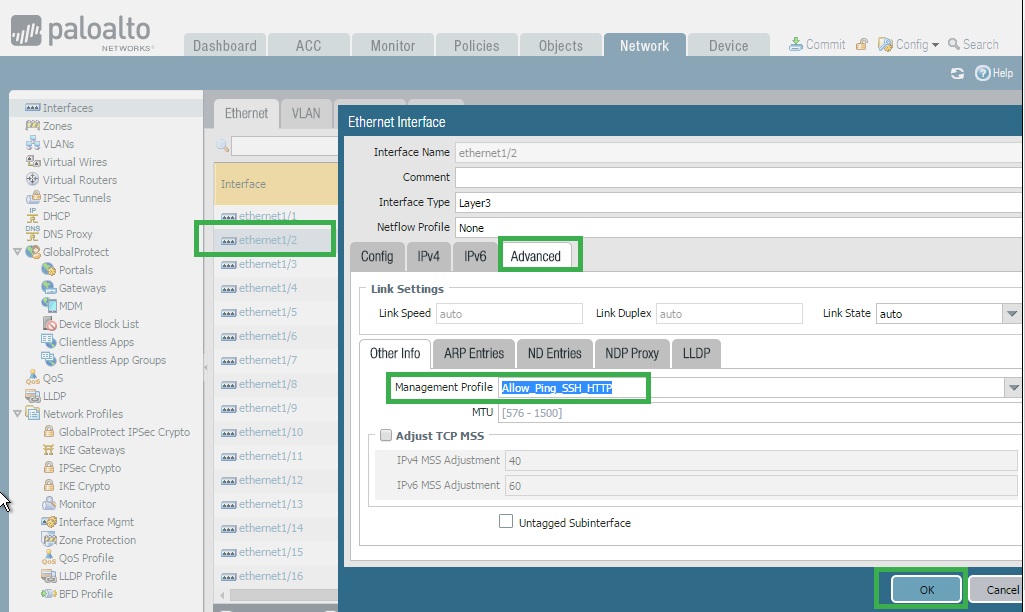
2. Create Interface Management Profile
● Go to Dashboard > Network > Network Profiles > Interface Mgmt
● Click on "Add" and give any name to the Interface Management profile (Like Allow_Ping_SSH_HTTP)
● Select services "ping" and click on "Add" to permit IP addresses subnets as 192.168.1.0/24
3. Apply the Management Interface Profile (Allow_Ping_SSH_HTTP) on Interfaces
4. Go to Dashboard > Network > Interfaces
5. Click on ethernet1/1
6. Advance > Management Profile
7. Select Create management profile "Allow_Ping_SSH_HTTP" from the drop-down
Once the interface management profile has been applied to all interfaces, click Commit (top-right corner) to apply changes.
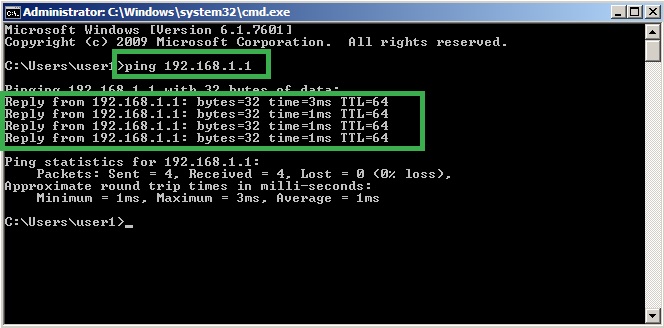
Then on open the PC console and try to do a ping test to the Palo Alto firewall interface, ethernet1/2 192.168.1.1:
ping 192.168.1.1
On Palo Alto console CLI
ping source 192.168.1.1 host 192.168.1.10

Similarly, you can apply the interface management profile on other interfaces, ethernet1/2 and ethernet1/3, to check the layer 3 connectivity.
Note: In our case, we have also applied the interface management profile on ethernet1/1 to check the reachability towards the internet gateway.
ping source 192.168.100.1 host 192.168.100.254
If ping is successful, Layer 3 connectivity is working fine.