
This SD-WAN lab practical will show you how to configure Feature Templates for OSPF for VPN0. You can practice along with this practical using our SD-WAN virtual lab.
Topology

Tasks
1. Configure a Device Template with the following parameters for Branch vEdge cloud devices
● Template Name: BR-VE-TEMP
● Description: BR-VE-TEMP-Description
● Basic Information
System ➔ VE-System
● Transport & Management
✓ VPN 0: BR-VE-VPN-VPN0
✓ VPN Interface: BR-VE-VPNINT-VPN0-G0
✓ VPN Interface: BR-VE-VPNINT-VPN0-G1
✓ OSPF: BR-VE-OSPF-VPN0
✓ VPN 512: BR-VE-VPN-VPN512
✓ VPN Interface: BR-VE-VPNINT-VPN512-Eth0
2. Attach vEdge2 Cloud Device to the Device Template “BR-VE-TEMP”
● Configure the variable parameters for feature templates
✓ Default Gateway for VPN0: 192.168.5.1
✓ Interface IP for Ge0/1: 10.1.5.1/24
✓ Interface IP for Ge0/0: 192.168.5.2/24
✓ Hostname: vEdge2
✓ System IP: 192.168.5.22
✓ Site ID: 2
Online Cisco SD-WAN TrainingLearn from expert trainers and master SD-WAN.Online SD-WAN Course

Configuration and Verification
Configure Device template for vEdge cloud devices. Go to vManage and navigate to Configuration->Templates-> Feature and then click on Add Templates

Now click on Create Template after clicking on Create Template we will get two option select 1st one
“From Feature Template”

Now select device modal as vEdge Cloud, Templates Name-BR-VE-TEMP and description as BR-VE-TEMP-Description

Now under Basic Information System select as VE-System

Under Transport & management VPN –select VPN0 as given for adding new VPN interface go to right panel (Additional VPN 0 Templates) and select +VPN Interface, +OSPF also for VPN 512 as given shown in below image.

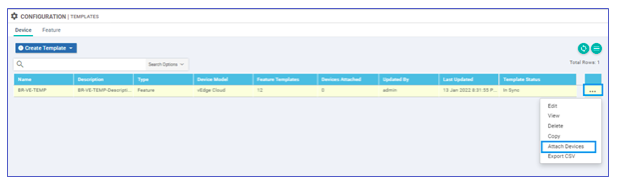
As we can see BR-VE-TEMP is created.

For attaching devices click on three dots and select Attach Devices option.
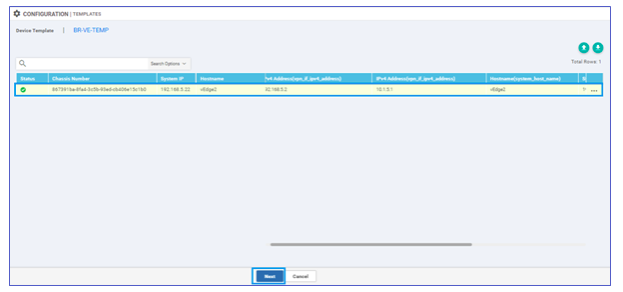
Now select vEdge2 Device ip 192.168.5.22 from left panel and press the arrow which is shown in below image and then click on Attach.

Now click on three dots and select Edit Device Temples.

Fill the details as given. the first interface for Ge0/1 with ip address 10.1.5.1/24 and the second interface for Ge0/0 with ip address 192.168.5.2/24

In below image we are able to see BR-VE-TEMP status with green symbol now click on next.
Click on device list which is shown in below image. now we are able to see the configuration which we push on our vEdge2 device.
Note- verify your configuration is correct for VPN0 interface Ge0/0as show in below image

Note- verify your configuration is correct for interface Ge0/1 and VPN 512 as show in below image

Now the status is green it means we have successfully attach our vEdge2 device.

Now for verification go to vEdge2 CLI and enter the command # show running-config vpn 0
Here we are able to see VPN0 and interface Ge0/1 configuration.


Here we are able to reachable to our MPLS Cloud

Here we are able verified the details of ospf neighbour.

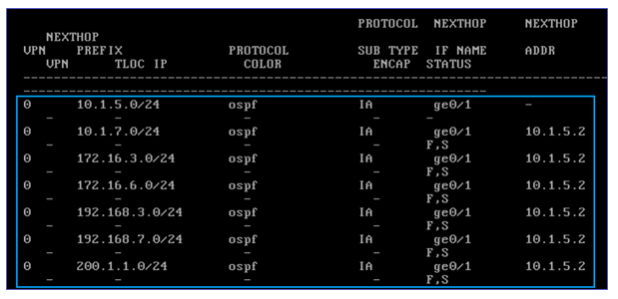
Now we are going to verified the details of ospf route using command >show ip routes ospf

Deepak Sharma
Linkedin Profile: https://www.linkedin.com/in/uninets-deepak-sharma/ He is a senior solution network architect and currently working with one of the largest financial company. He has an impressive academic and training background. He has completed his B.Tech and MBA, which makes him both technically and managerial proficient. He has also ...
More... | Author`s Bog | Book a MeetingRelated Articles
#Explore latest news and articles
.png) 14 Nov 2025
14 Nov 2025
Configuring Feature Templates for OSPF for VPN0
Discover how to configure Feature Templates for OSPF in VPN0 within Cisco SD-WAN in this online SD-WAN lab tutorial.
.png) 14 Nov 2025
14 Nov 2025
Configuring VPN0 & VPN512 Templates for vEdges
Learn how to effectively configure VPN0 and VPN512 templates for Cisco vEdge devices in this SD-WAN lab practical guide
.png) 14 Nov 2025
14 Nov 2025
Configuring SYSTEM and BANNER Feature Template
Master the art of configuring SYSTEM and BANNER feature templates in this hands-on SD-WAN lab practical.
Comments (0)
Popular posts


What are the Different Types of Network ...
6 Jun 2026
What is the Syllabus for CCNA ...
20 Jan 2026
Transmission Media and Its Types in ...
6 Jun 2026
CCNA Exam Fees and Expenses Breakdown
25 Aug 2025Recent posts

Fortinet Firewall Interview Questions ...
6 Jun 2026
What are the Different Types of Network ...
6 Jun 2026
Transmission Media and Its Types in ...
6 Jun 2026
Computer Networks MCQs with Solutions to ...
6 Jun 2026
What is the Syllabus for CCNA ...
20 Jan 2026Upcoming batches


Contact learning advisor